Consumer use of AI has been around for a few years now. While I use it daily at work, at home I’ve never really had the chance to play with it for a couple of reasons. First, priorities have shifted to allow more time with family. Second, I’ve always told myself I would only start heavy use of AI if I could self-host LLMs. But times have changed (and so have RAM and GPU prices!). With the recent price hike in PC hardware (ironically driven by AI, lol), I no longer find it economical to go the self-hosted route, especially if I’ll only be using it for general purposes like researching and light coding on weekends.
So last week, I once and for all let go of that mindset and started deploying OpenClaw. OpenClaw has been a hot topic in the tech space since the beginning of this year. It’s been all over the internet —on every tech news site, every forum, and every computer-related reddit thread. To be honest, I mostly ignored the articles I saw, though I did google it once out of curiosity. But the AI trend was real, and fast forward to today —I’ve managed to convert my shell scripts into a complete end-to-end stack of tools for measuring and analyzing network performance.
OpenClaw
If you’re not already aware, OpenClaw is an AI agent that can interact directly with your files, browse the web, execute shell commands (and yes, even create cron jobs!), read your entire email inbox (and respond when you like), manage your calendar, and more. I haven’t gone too far with it yet, but I’ve been using it for light coding —converting shell scripts and assembling the full stack of tools needed to publish network test results to a database with visualization.
There are many concerns on security and the extensive permissions it’s been granted to do almost anything. But from my perspective, OpenClaw is open-source anyway, and I do trust the open-source community. That doesn’t mean I don’t value security. But I believe anyone who wants and is able to deploy the software, should also have the capability to assess how much data and what level of confidentiality they are willing to risk. Fo my use case of light coding and research, it fits the bill!
That being said, there are also plenty of recommendations online to have it running on an isolated environment such as a VPS or separate machine. For some people, they have it deployed on the base model of a Mac mini. In my environment, it’s deployed on my Proxmox cluster, and on an isolated VLAN where only access to the internet and another VM (sandbox) are allowed. I haven’t faced issues allocating 2 CPU and 4GB RAM for it, but I would suggest having sufficient disk space in case you intend to build applications within the same environment.
Openclaw is just the agent —a carriage without a horse. I still needed a model that will do the thinking and suggest the next actions. There was an option to use the subscription Oauth token from Claude or Gemini, but the companies behind them started cracking down on users who use this approach insteading of paying for the API access. So I hopped onto Openrouter’s rankings and found Step 3.5 Flash (Free) sitting there on the Top 10. Since then I’ve been using the same model and even signed up for the actual API subscription from the company’s official website after exhausting the limits from Openrouter.
Design
The project idea was very simple and there’s nothing special about the design. It follows the same flow as any other download speed test app: users perform the test, results are sent to an API endpoint. But I’m a sucker for visually appealing diagrams, so I made one anyway!
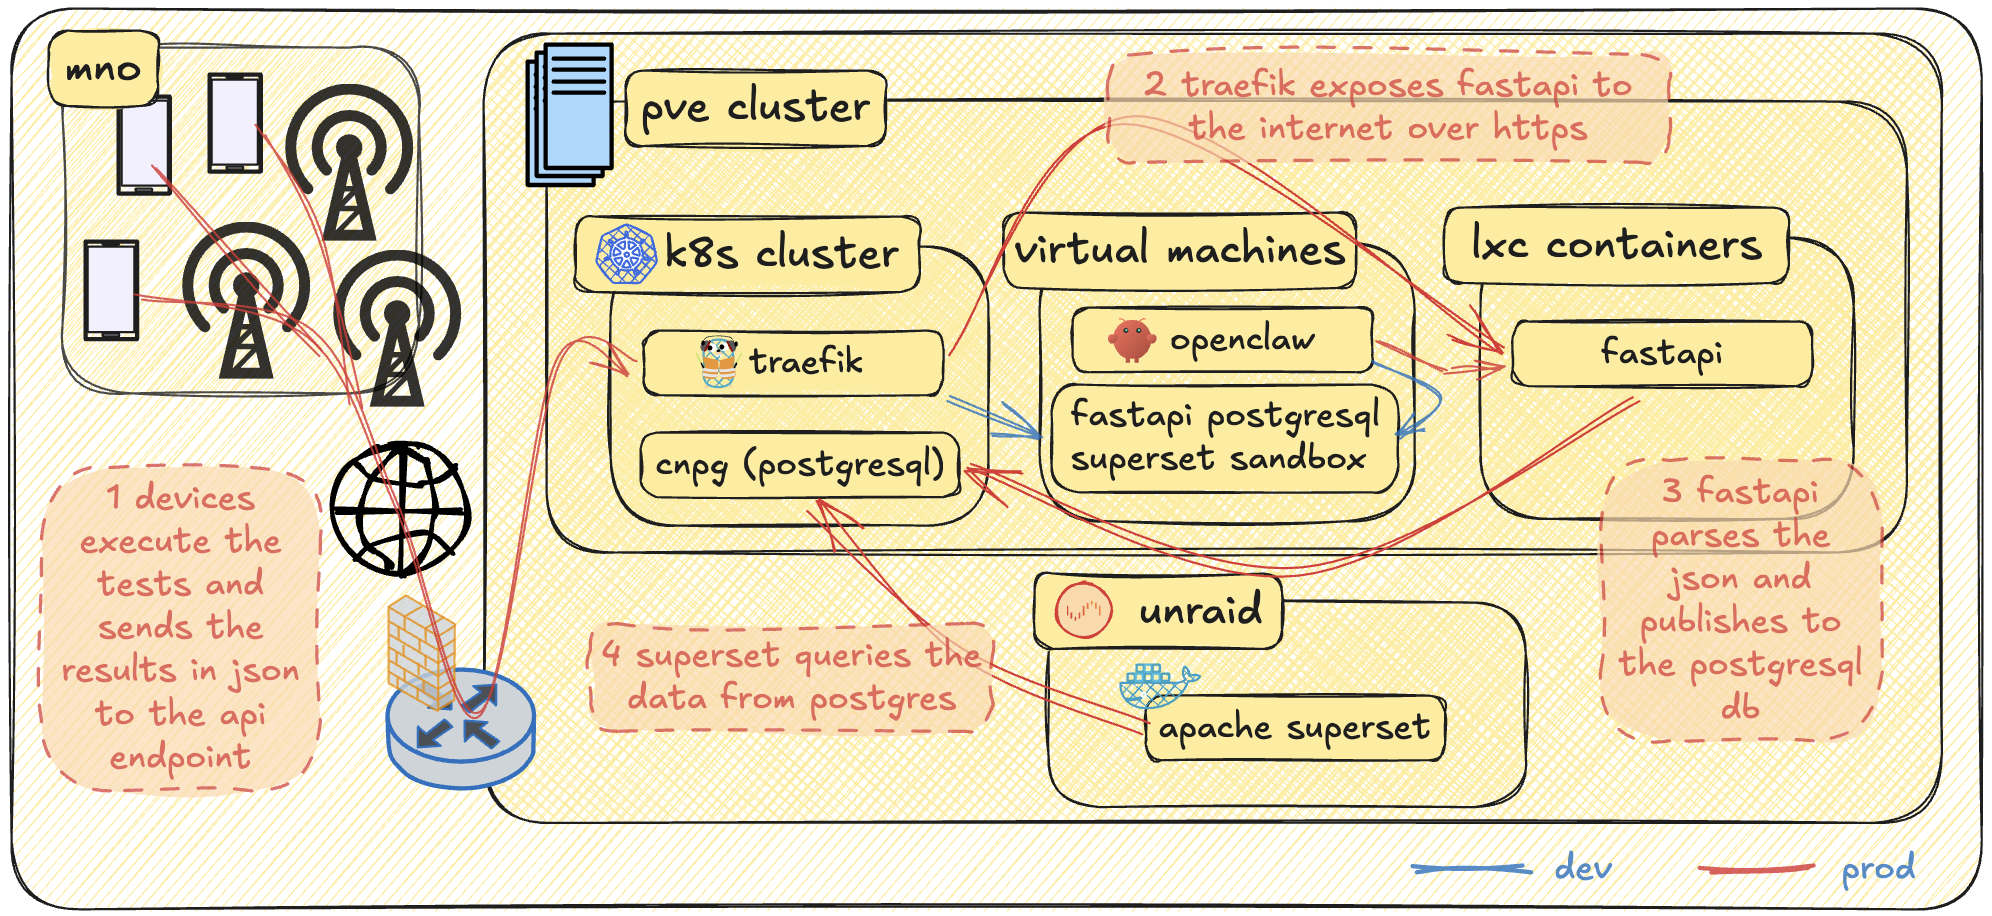
The infrastructure already existed. The only new components here are OpenClaw, the sandbox environment, and the applications —the Android app, FastAPI, PostgreSQL, and Apache Superset. During development, I had OpenClaw access the sandbox environment to polish the configuration. FastAPI, PostgreSQL, and Superset were all initially deployed on a single VM, but the plan from the start for the “prod” setup was to isolate them in containers. FastAPI wasn’t dockerized yet, so it was deployed in an LXC container. This will definitely be migrated to the k8s cluster, but for now I just wanted to beat the clock and get something working quickly. Superset, from the beginning, was already running in Docker. However, I wanted more processing horsepower for a snappy visualization experience —and for that, only my Unraid host was suitable. As for PostgreSQL, it’s deployed in my k8s cluster using the cnpg helm chart with a Ceph RBD backend storage.
Building the APK and bringing life into my shell scripts
I’m not a developer, but I can work with shell scripts. Before all this my tool set consisted of separate shell scripts I made in the past. My challenge is that not everyone understands shell, and it’s quite difficult to keep explaining to anyone who wants to perform tests how to execute shell scripts from a mobile phone. Performance-wise, for most of the time they did a good job. But there were times when one of the tests would deviate a little from the expectation, and I would only find out after analyzing the trace. The idea was to have an app that will run natively on the device’s OS that brings along a whole different ball game of flexibility and usability. Then came the idea of building an actual app in Android Studio with the help of AI. I definitely hit the API limits of Gemini and Claude for this one. So the first project I used OpenClaw for was to assist in reviewing and modifying the code. The app is written in Kotlin, and its main goal is to perform network throughput tests. The conditions are simple:
- There are three different types of test: download throughput, TCP latency, and UDP latency.
- For download test, user should be able to specify the download URL.
- User should also be able to specify how many URLs it wants to be part of the download test.
- For UDP and TCP latency test, user should be able to specify the IP address or FQDN.
- There should be an option to group these tests and perform multiple iterations.
- Network conditions are necessary to be captured at the beginning of every test.
- Timestamps are to be captured as well before and after each test.
- There should be a field to specify an API URL endpoint.
- At the end of every global iteration, the test results should be captured in JSON format and should be sent to the specified API URL.
- There should also be an option to save the JSON output locally.
- The start button should be greyed out whenever there is an ongoing test.
There are more conditions specific to each test but I’ll save that for later.
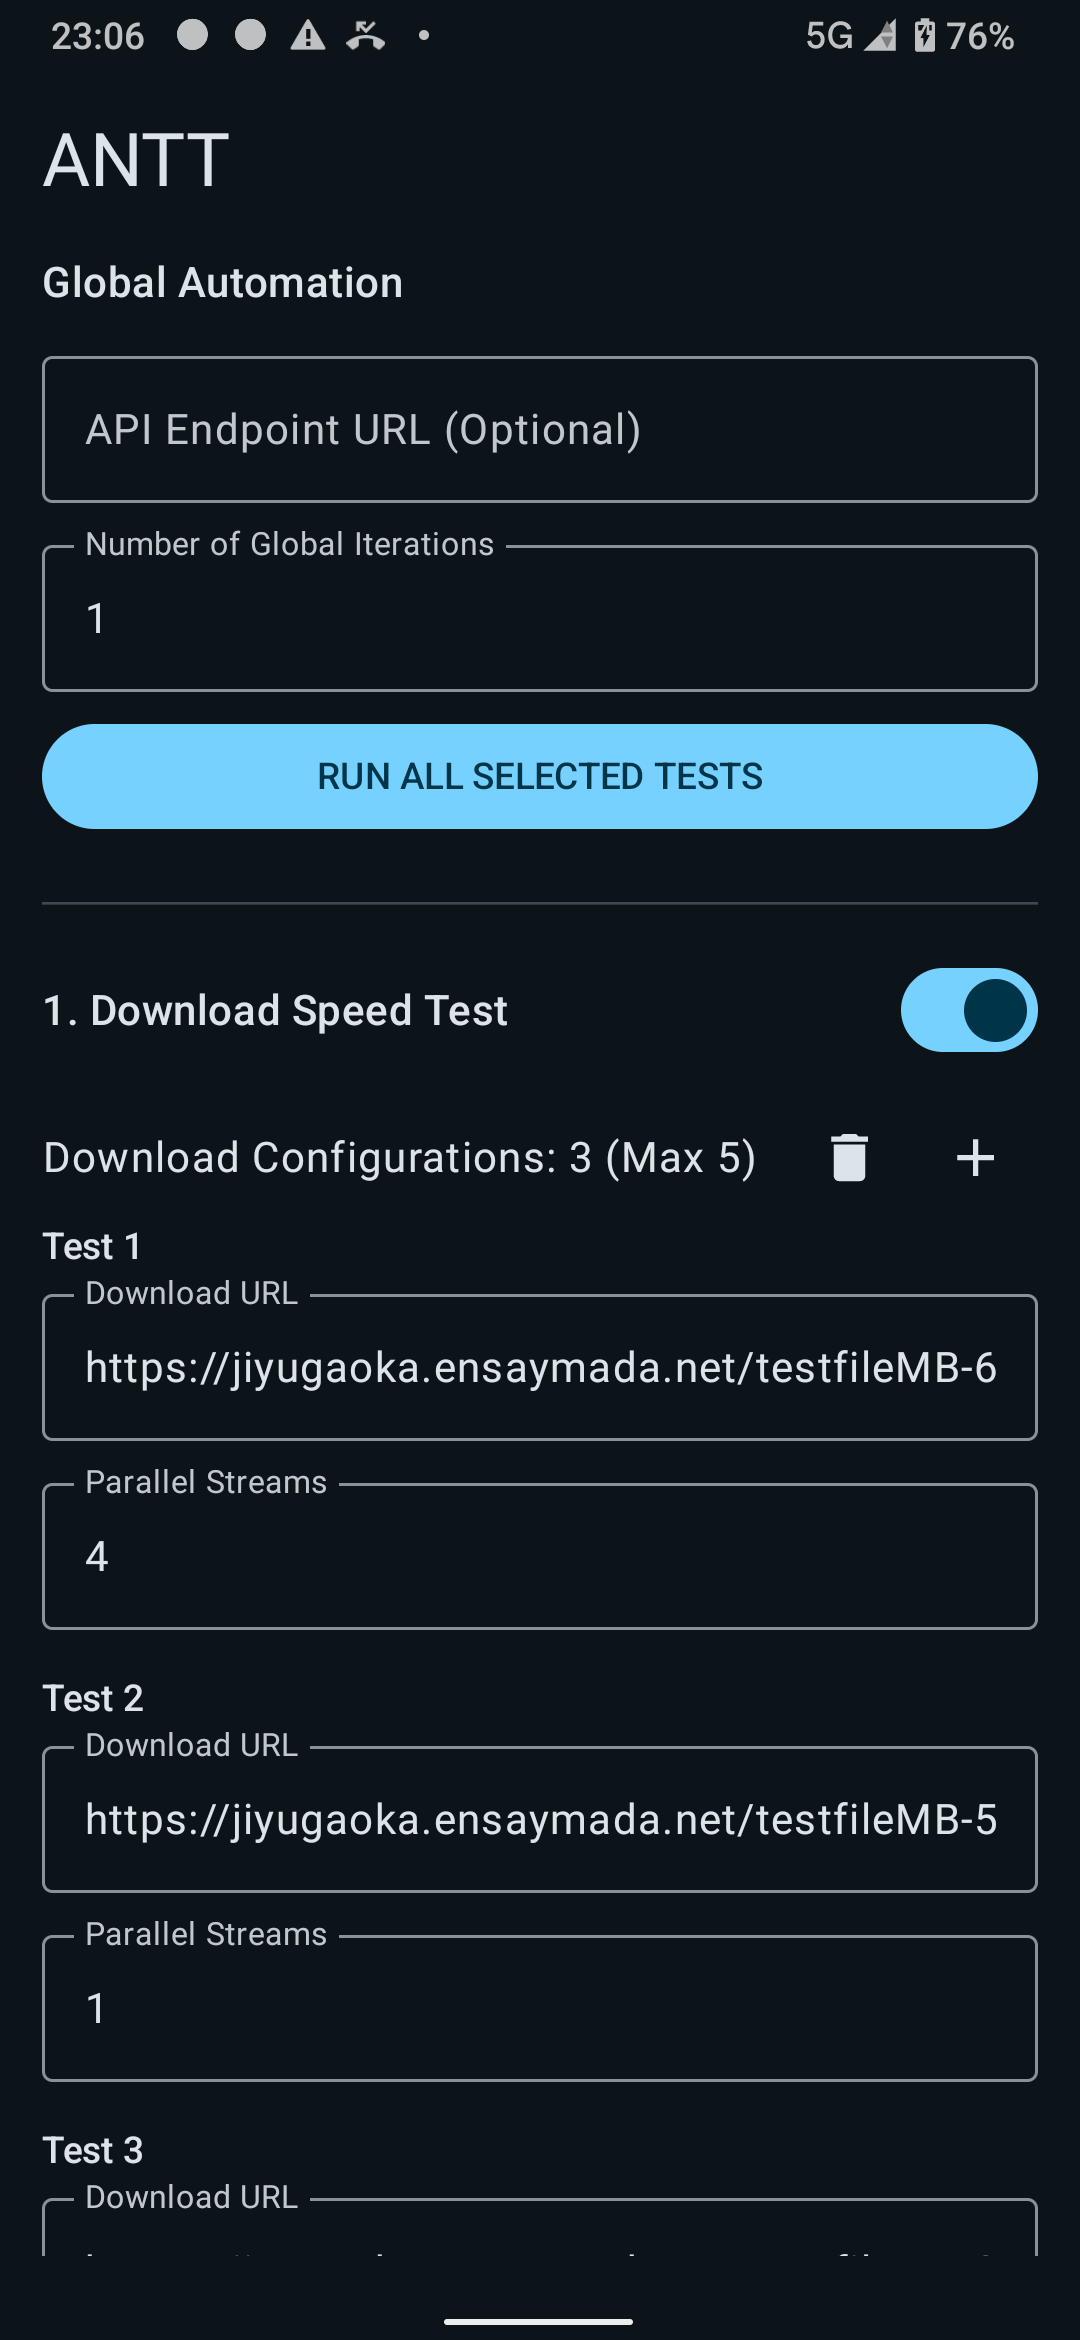
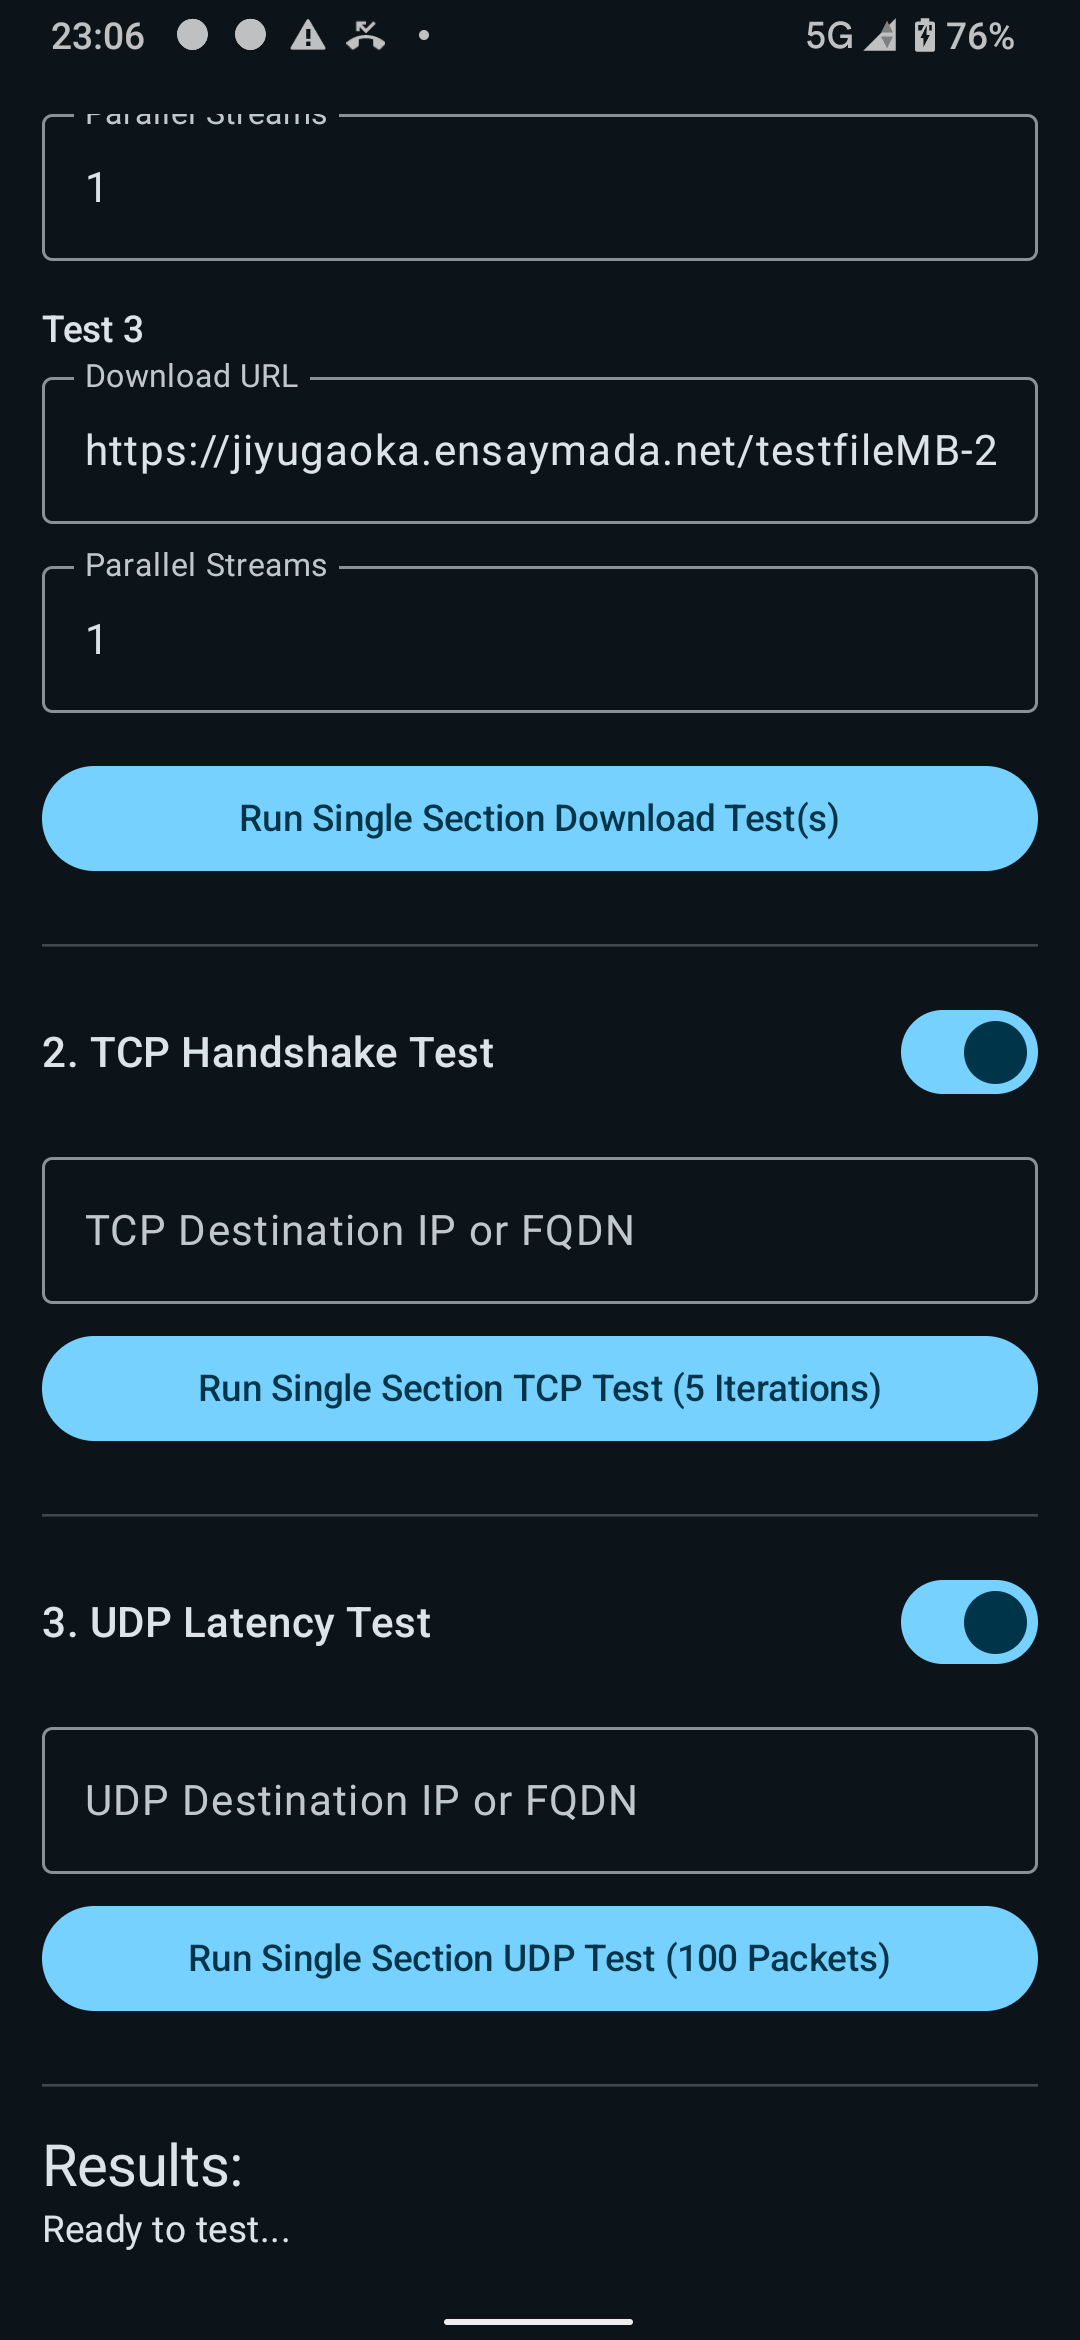
ANTT: Automated Network Testing Tool
I was working on this during my free time at home, and, after a few days, I was able to tick off everything in the checklist! You can see the sample snaps of the app below:

JSON output
The app has the feature to run multiple iterations so there are two UUIDs generated. The true UUID across all tests is printed as the first key-value pair. The secondary UUID or run_id is only unique for each press of the start button. It will persist on multiple iterations. Timestamps are also recorded before and after every iteration for easier mapping of traces. The rest are pretty much self-explanatory.
{
  "uuid": "d81ba2d4-a21e-4da8-9657-f2f2fdc42366",
  "run_id": "8a6f53de-42f4-472b-95aa-c60f07db6f88",
  "iteration": 1,
  "timestamp_start": "2026-03-28T20:57:19",
  "timestamp_end": "2026-03-28T20:57:38",
  "location": "36.11950402, 140.00541702",
  "netinfo_Timestamp": "2026-03-28T20:57:19",
  "netinfo_Coordinates": "40.61950402, 123.60541702",
  "netinfo_Connection": "4G/LTE",
  "netinfo_IPv4": "172.16.0.31",
  "netinfo_IPv6": "2020:dead:beef:188d:cd48:3c9e:e489:2cd",
  "netinfo_MSISDN": "N/A",
  "netinfo_IMSI": "N/A (Restricted)",
  "netinfo_Operator": "REDACTED",
  "netinfo_Cell_ID": "71989000",
  "netinfo_RSRP": "-89 dBm",
  "netinfo_RSRQ": "-7 dB",
  "downloadtest1_url": "https://jiyugaoka.ensaymada.net/800MB.bin",
  "downloadtest1_streams": 4,
  "downloadtest1_downloaded_mb": 35,
  "downloadtest1_avg_mbps": 28.93510269426006,
  "downloadtest1_peak_mbps": 70.07809900990098,
  "downloadtest2_url": "https://jiyugaoka.ensaymada.net/3MB.bin",
  "downloadtest2_streams": 1,
  "downloadtest2_downloaded_mb": 5,
  "downloadtest2_avg_mbps": 21.3559266802444,
  "downloadtest2_peak_mbps": 38.55058823529412,
  "downloadtest3_url": "https://jiyugaoka.ensaymada.net/1MB.bin",
  "downloadtest3_streams": 1,
  "downloadtest3_downloaded_mb": 2,
  "downloadtest3_avg_mbps": 20.140715486194477,
  "downloadtest3_peak_mbps": 27.252594059405936,
  "downloadtest4_url": null,
  "downloadtest4_streams": null,
  "downloadtest4_downloaded_mb": null,
  "downloadtest4_avg_mbps": null,
  "downloadtest4_peak_mbps": null,
  "downloadtest5_url": null,
  "downloadtest5_streams": null,
  "downloadtest5_downloaded_mb": null,
  "downloadtest5_avg_mbps": null,
  "downloadtest5_peak_mbps": null,
  "tcptest_avg_ms": 37.4,
  "tcptest_median_ms": 37,
  "tcptest_min_ms": 34,
  "tcptest_max_ms": 41,
  "udptest_success_percent": 100,
  "udptest_avg_ms": 33.96,
  "udptest_median_ms": 32,
  "udptest_min_ms": 25,
  "udptest_max_ms": 81,
  "id": 7
}
FastAPI, PostgreSQL, and Apache Superset for visualization
I heard about fastAPI at the time of building a static website for another automation project. From a beginner’s standpoint, the learning curve wasn’t really that steep. Or maybe it’s easy to say that because my use cases were pretty simple. But overall dealing with FastAPI was pretty straight forward. You define the paths and the corresponding python functions you want to call. It was a fairly easy task for OpenClaw to create the required files to parse the JSON data and publish to a postgres backend.
Talking about Postgres, as I mentioned earlier, the CNPG helm chart was used to deploy this in my k8s cluster. Though it was deployed through ArgoCD since I always keep practice of infrastructure-as-code. First I had to deploy the cnpg operator. Below is a sample snip of the ArgoCD manifest:
apiVersion: argoproj.io/v1alpha1
kind: Application
metadata:
  name: cnpg
  namespace: argocd
spec:
  destination:
    namespace: cnpg-system
    server: https://kubernetes.default.svc
  project: default
  sources:
    - repoURL: 'https://cloudnative-pg.github.io/charts'
      chart: cloudnative-pg
      targetRevision: 0.27.1
      helm:
        releaseName: cnpg
        valueFiles:
          - $values/cnpg/values.yaml
    - repoURL: [email protected]:mygituser/tokyo-prod.git
      targetRevision: HEAD
      ref: values
    - repoURL: [email protected]:mygituser/tokyo-prod.git
      path: cnpg/manifests
      targetRevision: HEAD
  syncPolicy:
    automated:
      prune: true
    syncOptions:
      - CreateNamespace=true
      - ServerSideApply=true
Then the actual cnpg cluster:
apiVersion: argoproj.io/v1alpha1
kind: Application
metadata:
  name: cnpg-cluster-dev
  namespace: argocd
spec:
  destination:
    namespace: cnpg-cluster-dev
    server: https://kubernetes.default.svc
  project: default
  sources:
    - repoURL: [email protected]:mygituser/tokyo-prod.git
      path: cnpg-cluster-dev/manifests
      targetRevision: HEAD
  syncPolicy:
    automated:
      prune: false
      selfHeal: true
    syncOptions:
      - CreateNamespace=true
As for Apache Superset, this might be a little bit overkill for the job but it’s still nice to have nevertheless. I faced a few hiccups here and there but so far there’s nothing AI couldn’t fix for this setup. What I actually did was demand OpenClaw to have Superset docker instance running and gave a requirement to have the compose files to connect to my remote postgresql database. It asked for the connection information then proceeded to create the yaml file. It also identified that the setup required the installation of required packages to connect to a postgres backend so it also provided a Dockerfile.

From within the superset dashboard, the queries were failing at first. After sharing the error message to OpenClaw, it then identified a minor misconfiguration on the RedisDB. I was surprised it proactively tried to fix the configuration – restarting the containers as well. For every change and restart, it also verified whether the error has been cleared and if the query would function. After a few container restarts, a bit more of modification requests, everything was working perfectly.
Since it performed the changes proactively, it was a pain to keep track of them from the chat window. I asked it to create a README.md file of all the changes it made with a short simple description for the reason. It did a pretty good job covering everything from the creation of the custom Docker image until the SQL data type revisions I had towards the end.
The wrap up and what’s in the roadmap
The past few late night work I’ve had for this project was all filled in with curiousity and excitement. Every press of the enter button for each prompt always had me thinking if the agent would give proper results. It did and even exceeded my expectations! Those times I would share the error message asking for a fix, it performed proactively without asking, and verifying whether the changes worked. When it hit a new error during verification, it looped back to trying to find the next solution. Yes it’s pretty scary especially if you can’t keep track of the changes in real time. Definitely, a risk. But really, it just works. It’s up to the user how to manage this. And apart from version control, there should already be common and general practices how to deal with this. Also, Openclaw is not just the only autonomous agent out there. There are other options like nanobot built with a smaller footprint of python that can be easier for the user to understand and perform modifications on top of. For those cocnerned with privacy, then there’s also the self-hosted option.
It’s just the start, but I can’t wait to see what else and others can build with AI!
Talking about the app and the complete stack, these are in the very initial phase. However, there are still a few things I want to cover later on. Off the top of my head:
- Containerize FastAPI and migrate it to the Kubernetes cluster.
- Maybe migrate Superset to the Kubernetes cluster as well.
- Run tcpdump while tests are running (not even sure if this is possible, lol)
- Add the ability to import and save configuration (maybe using XML).
- Add a scheduling or interval feature for the global iteration loop.
- Add authentication to the API requests.