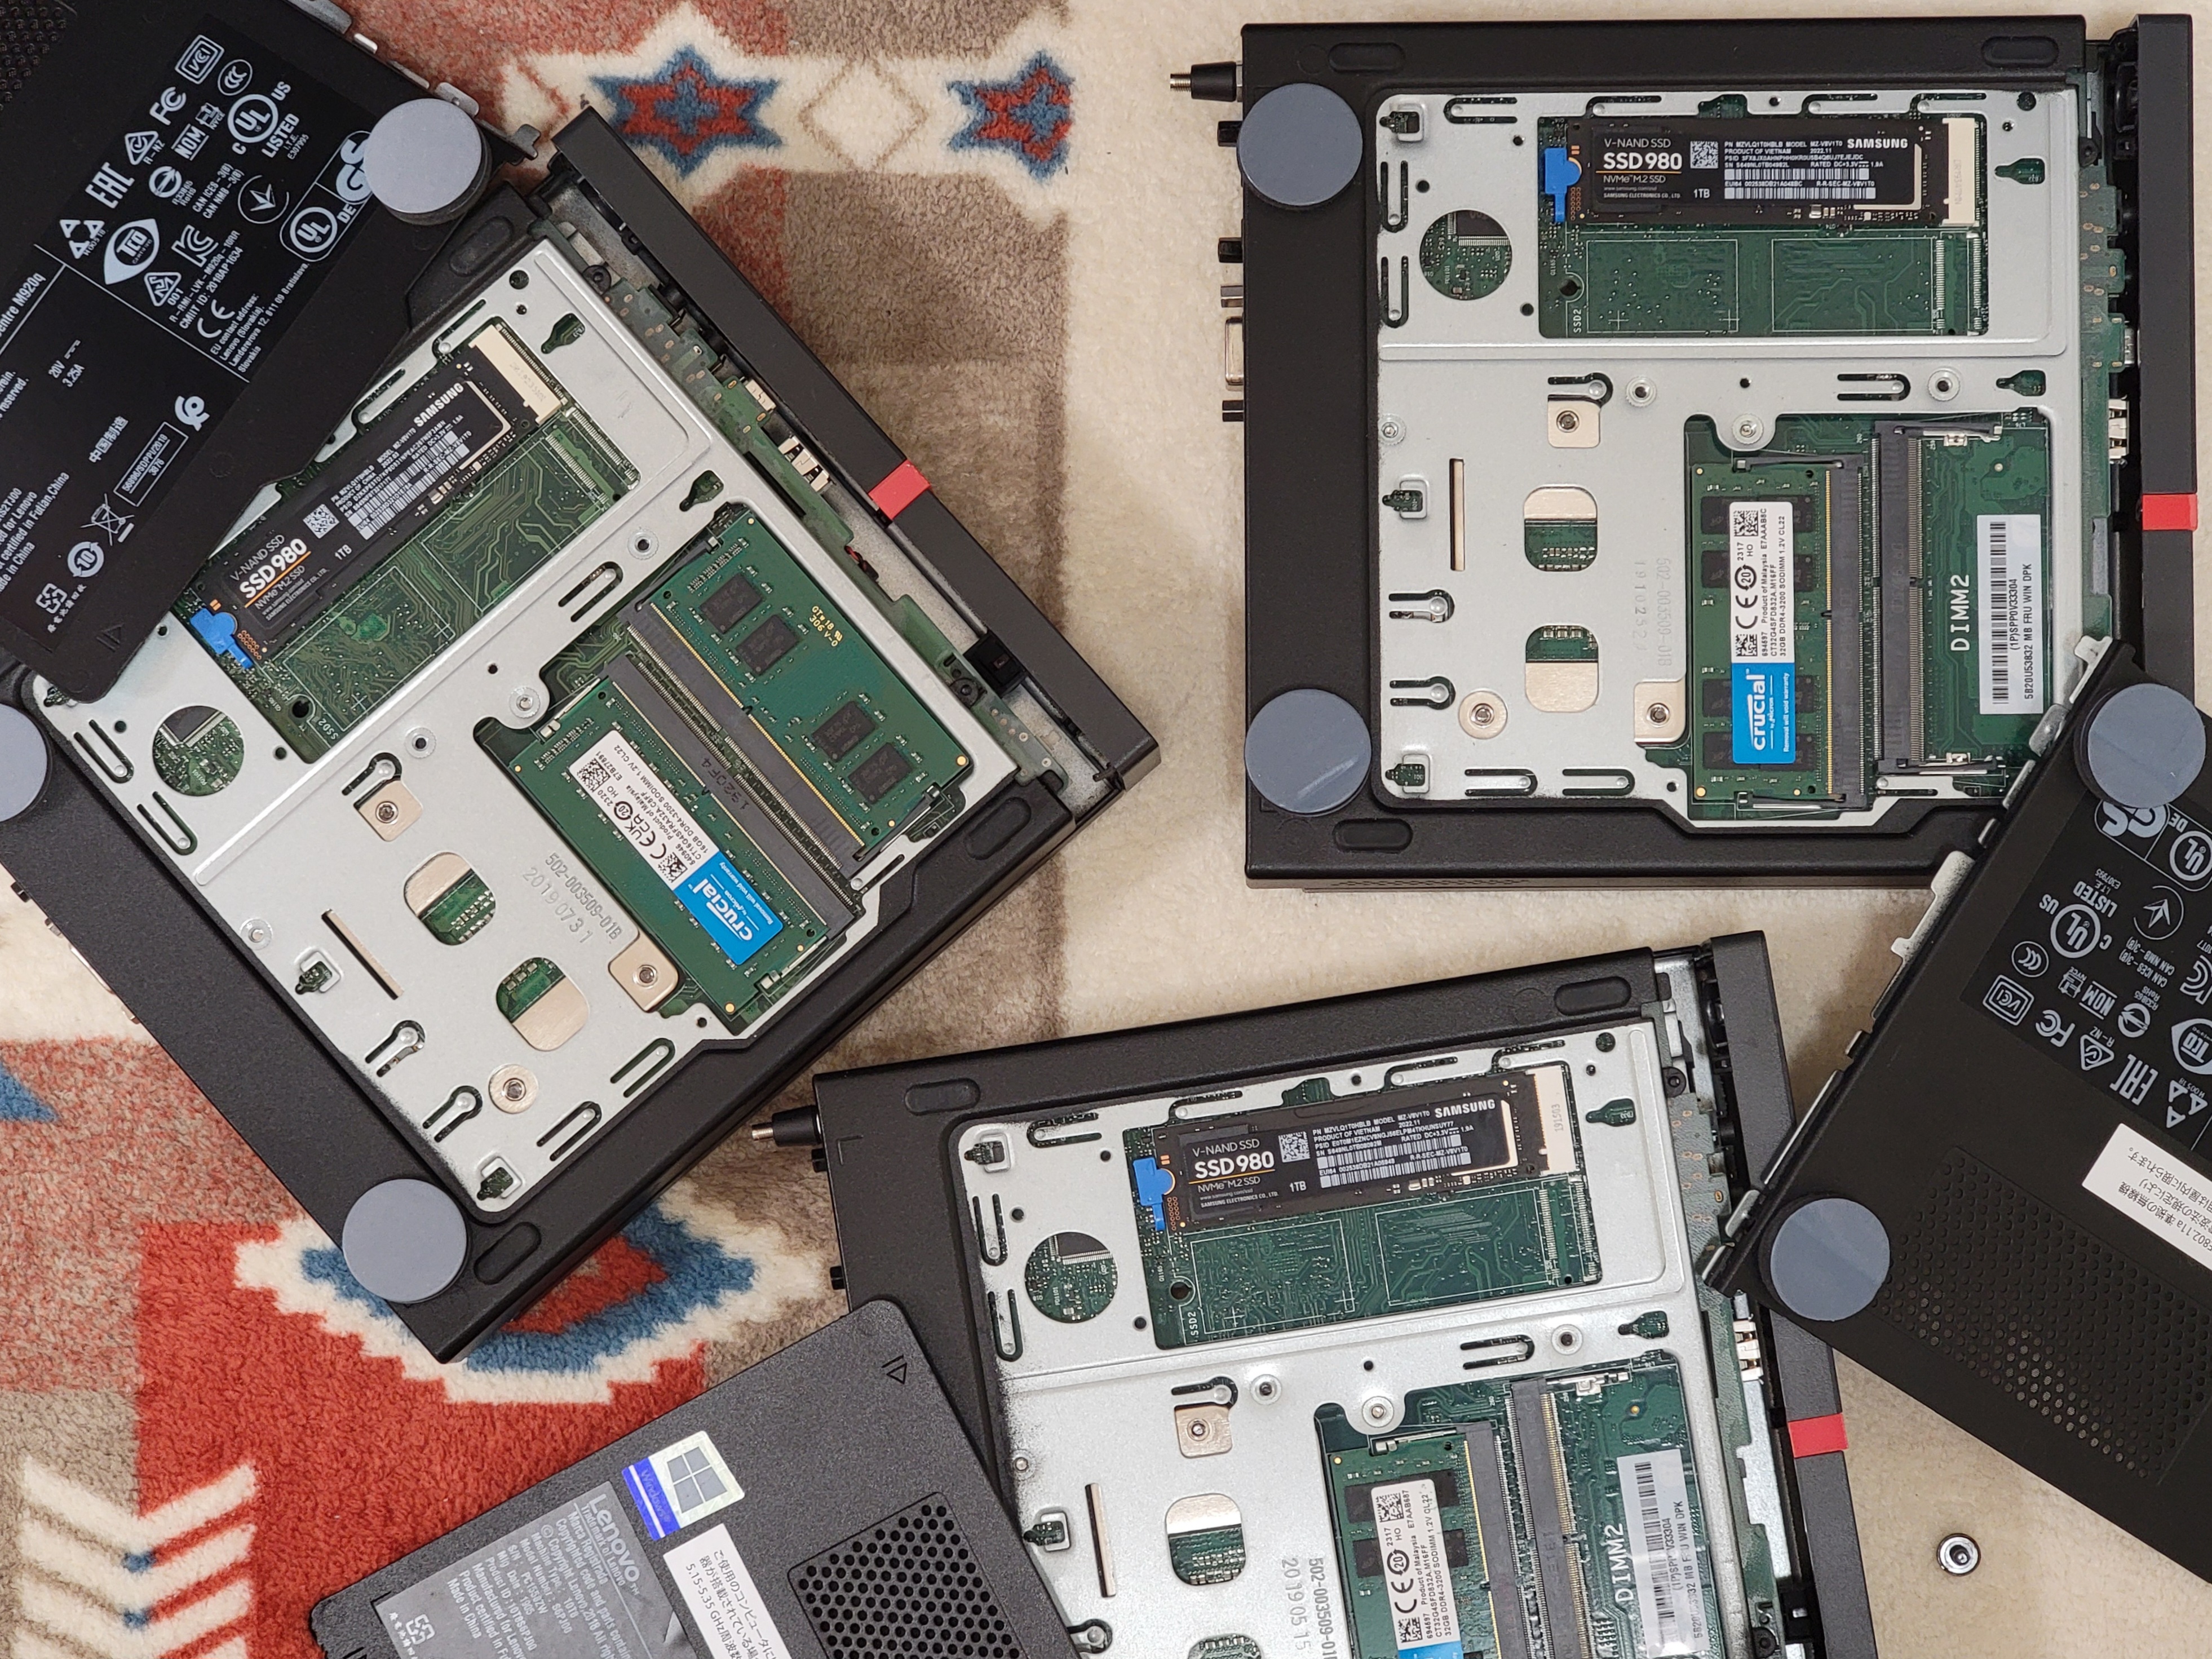
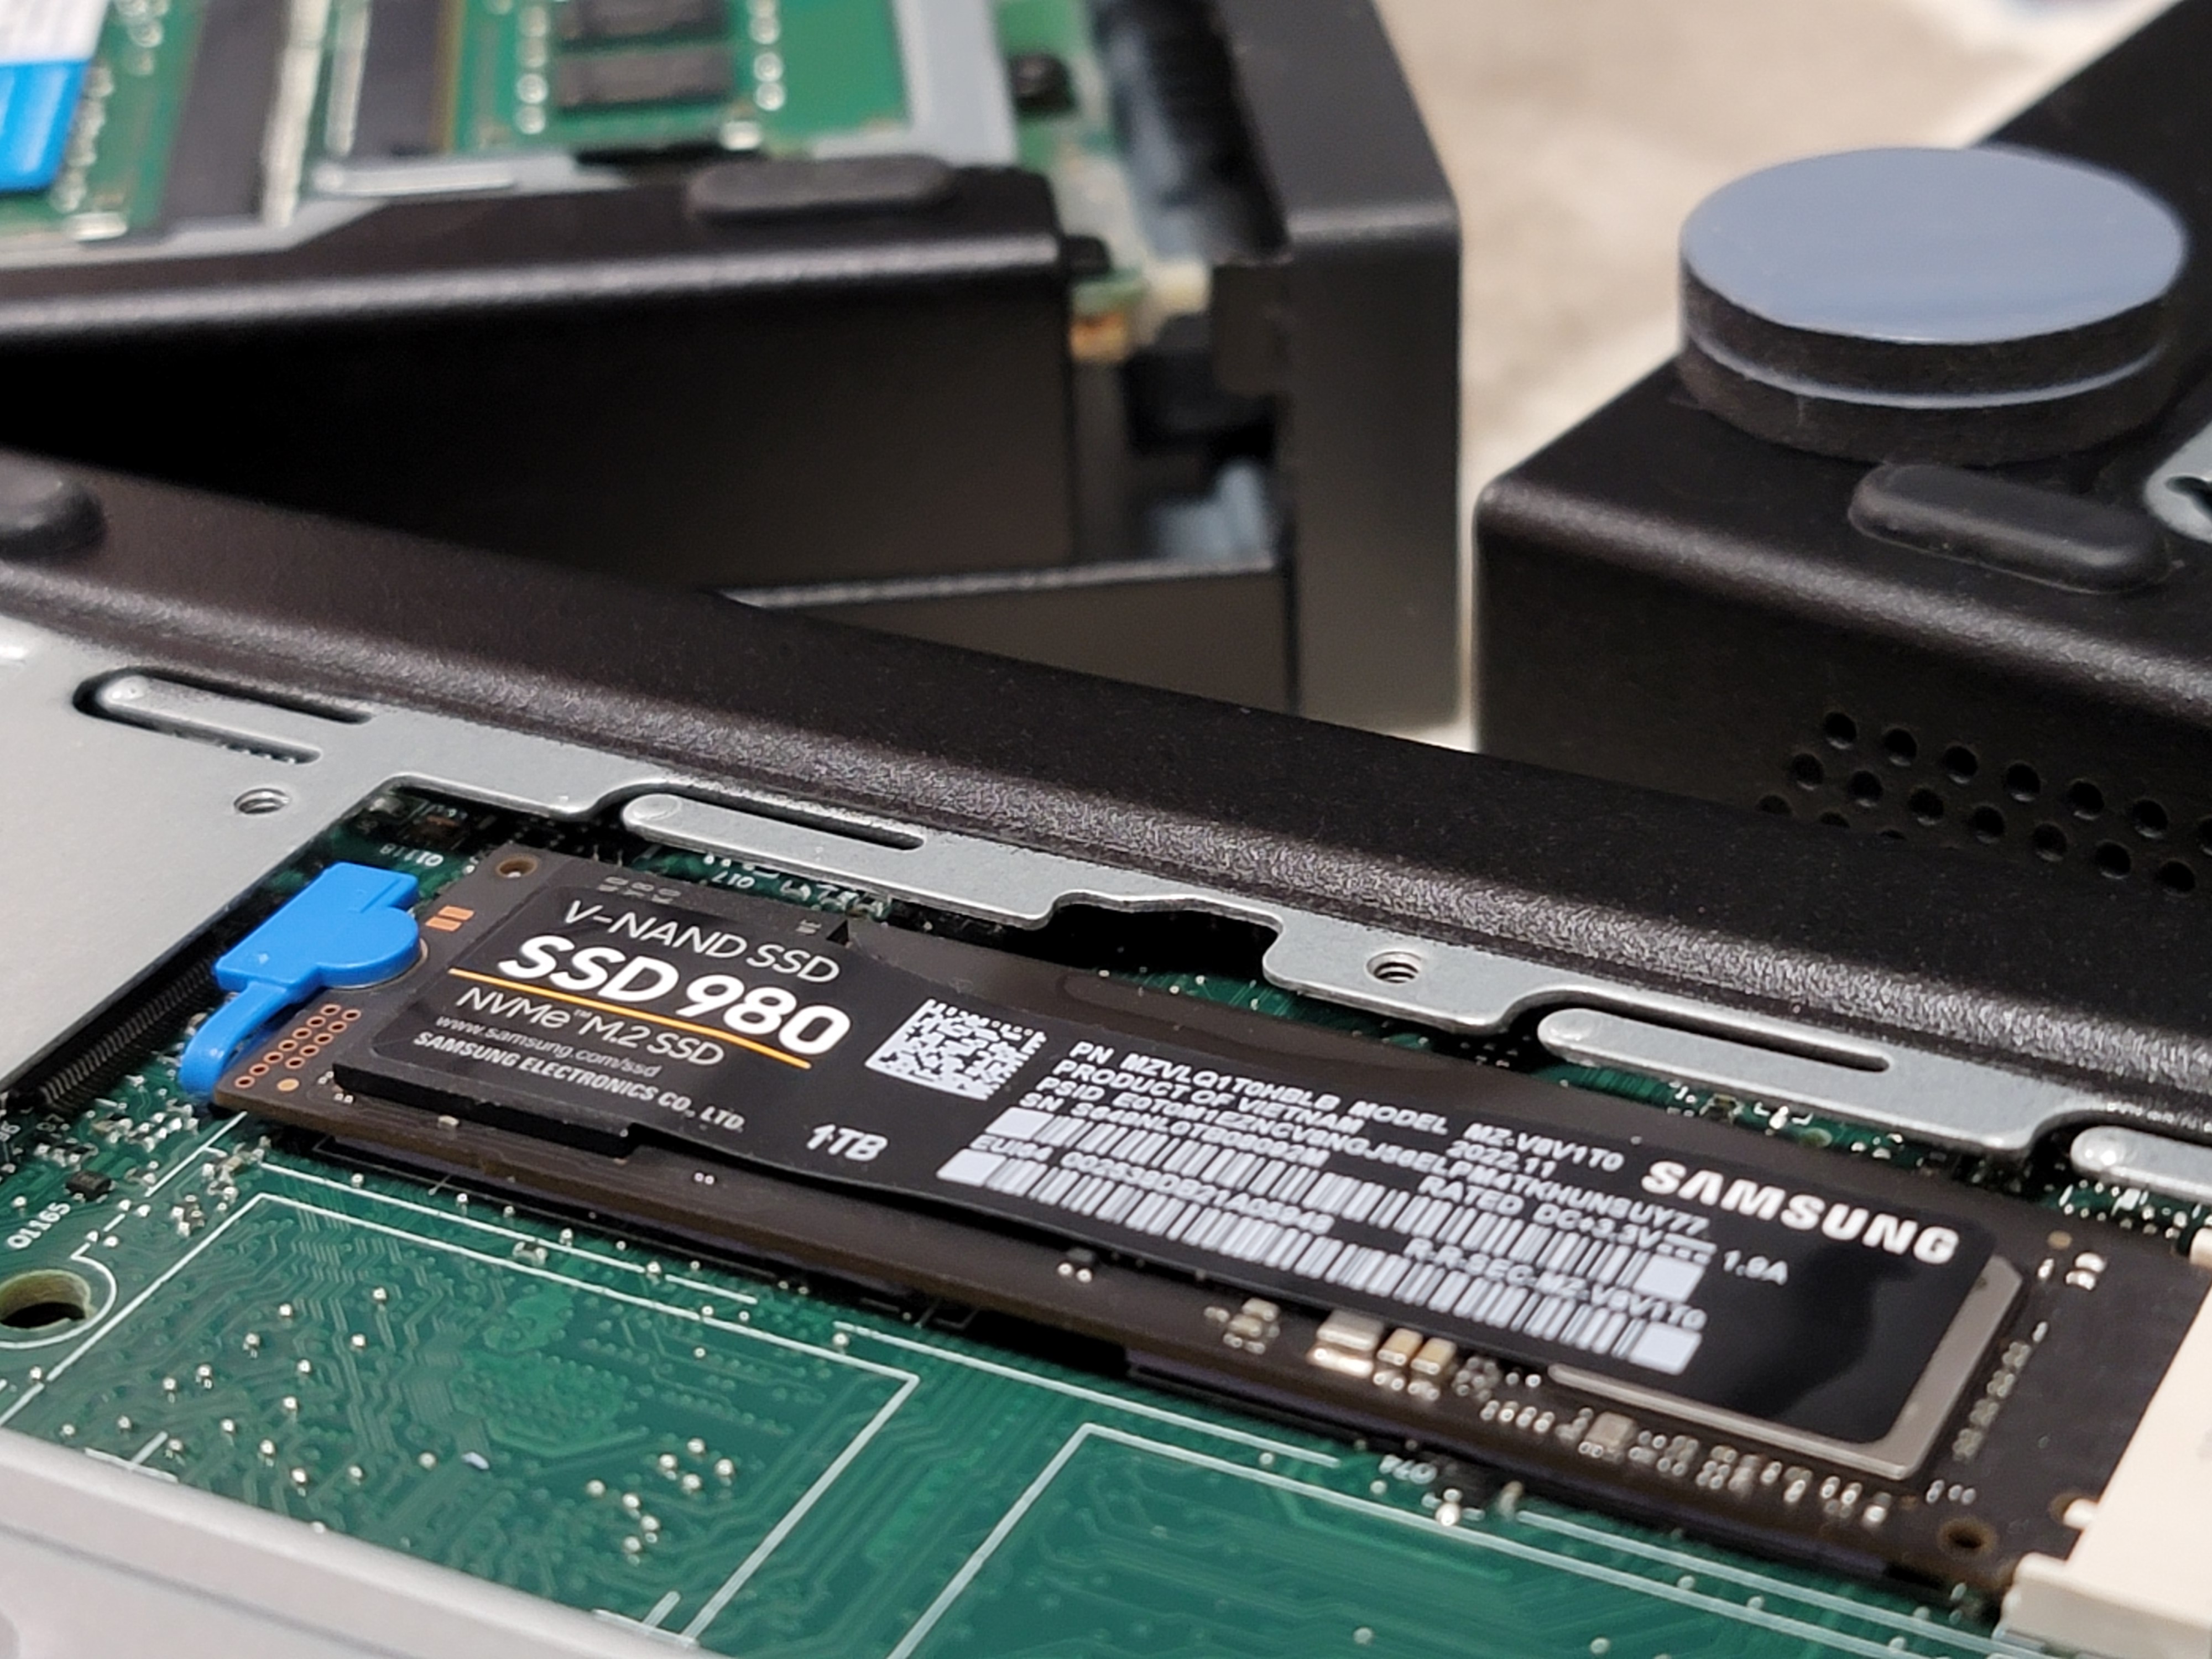
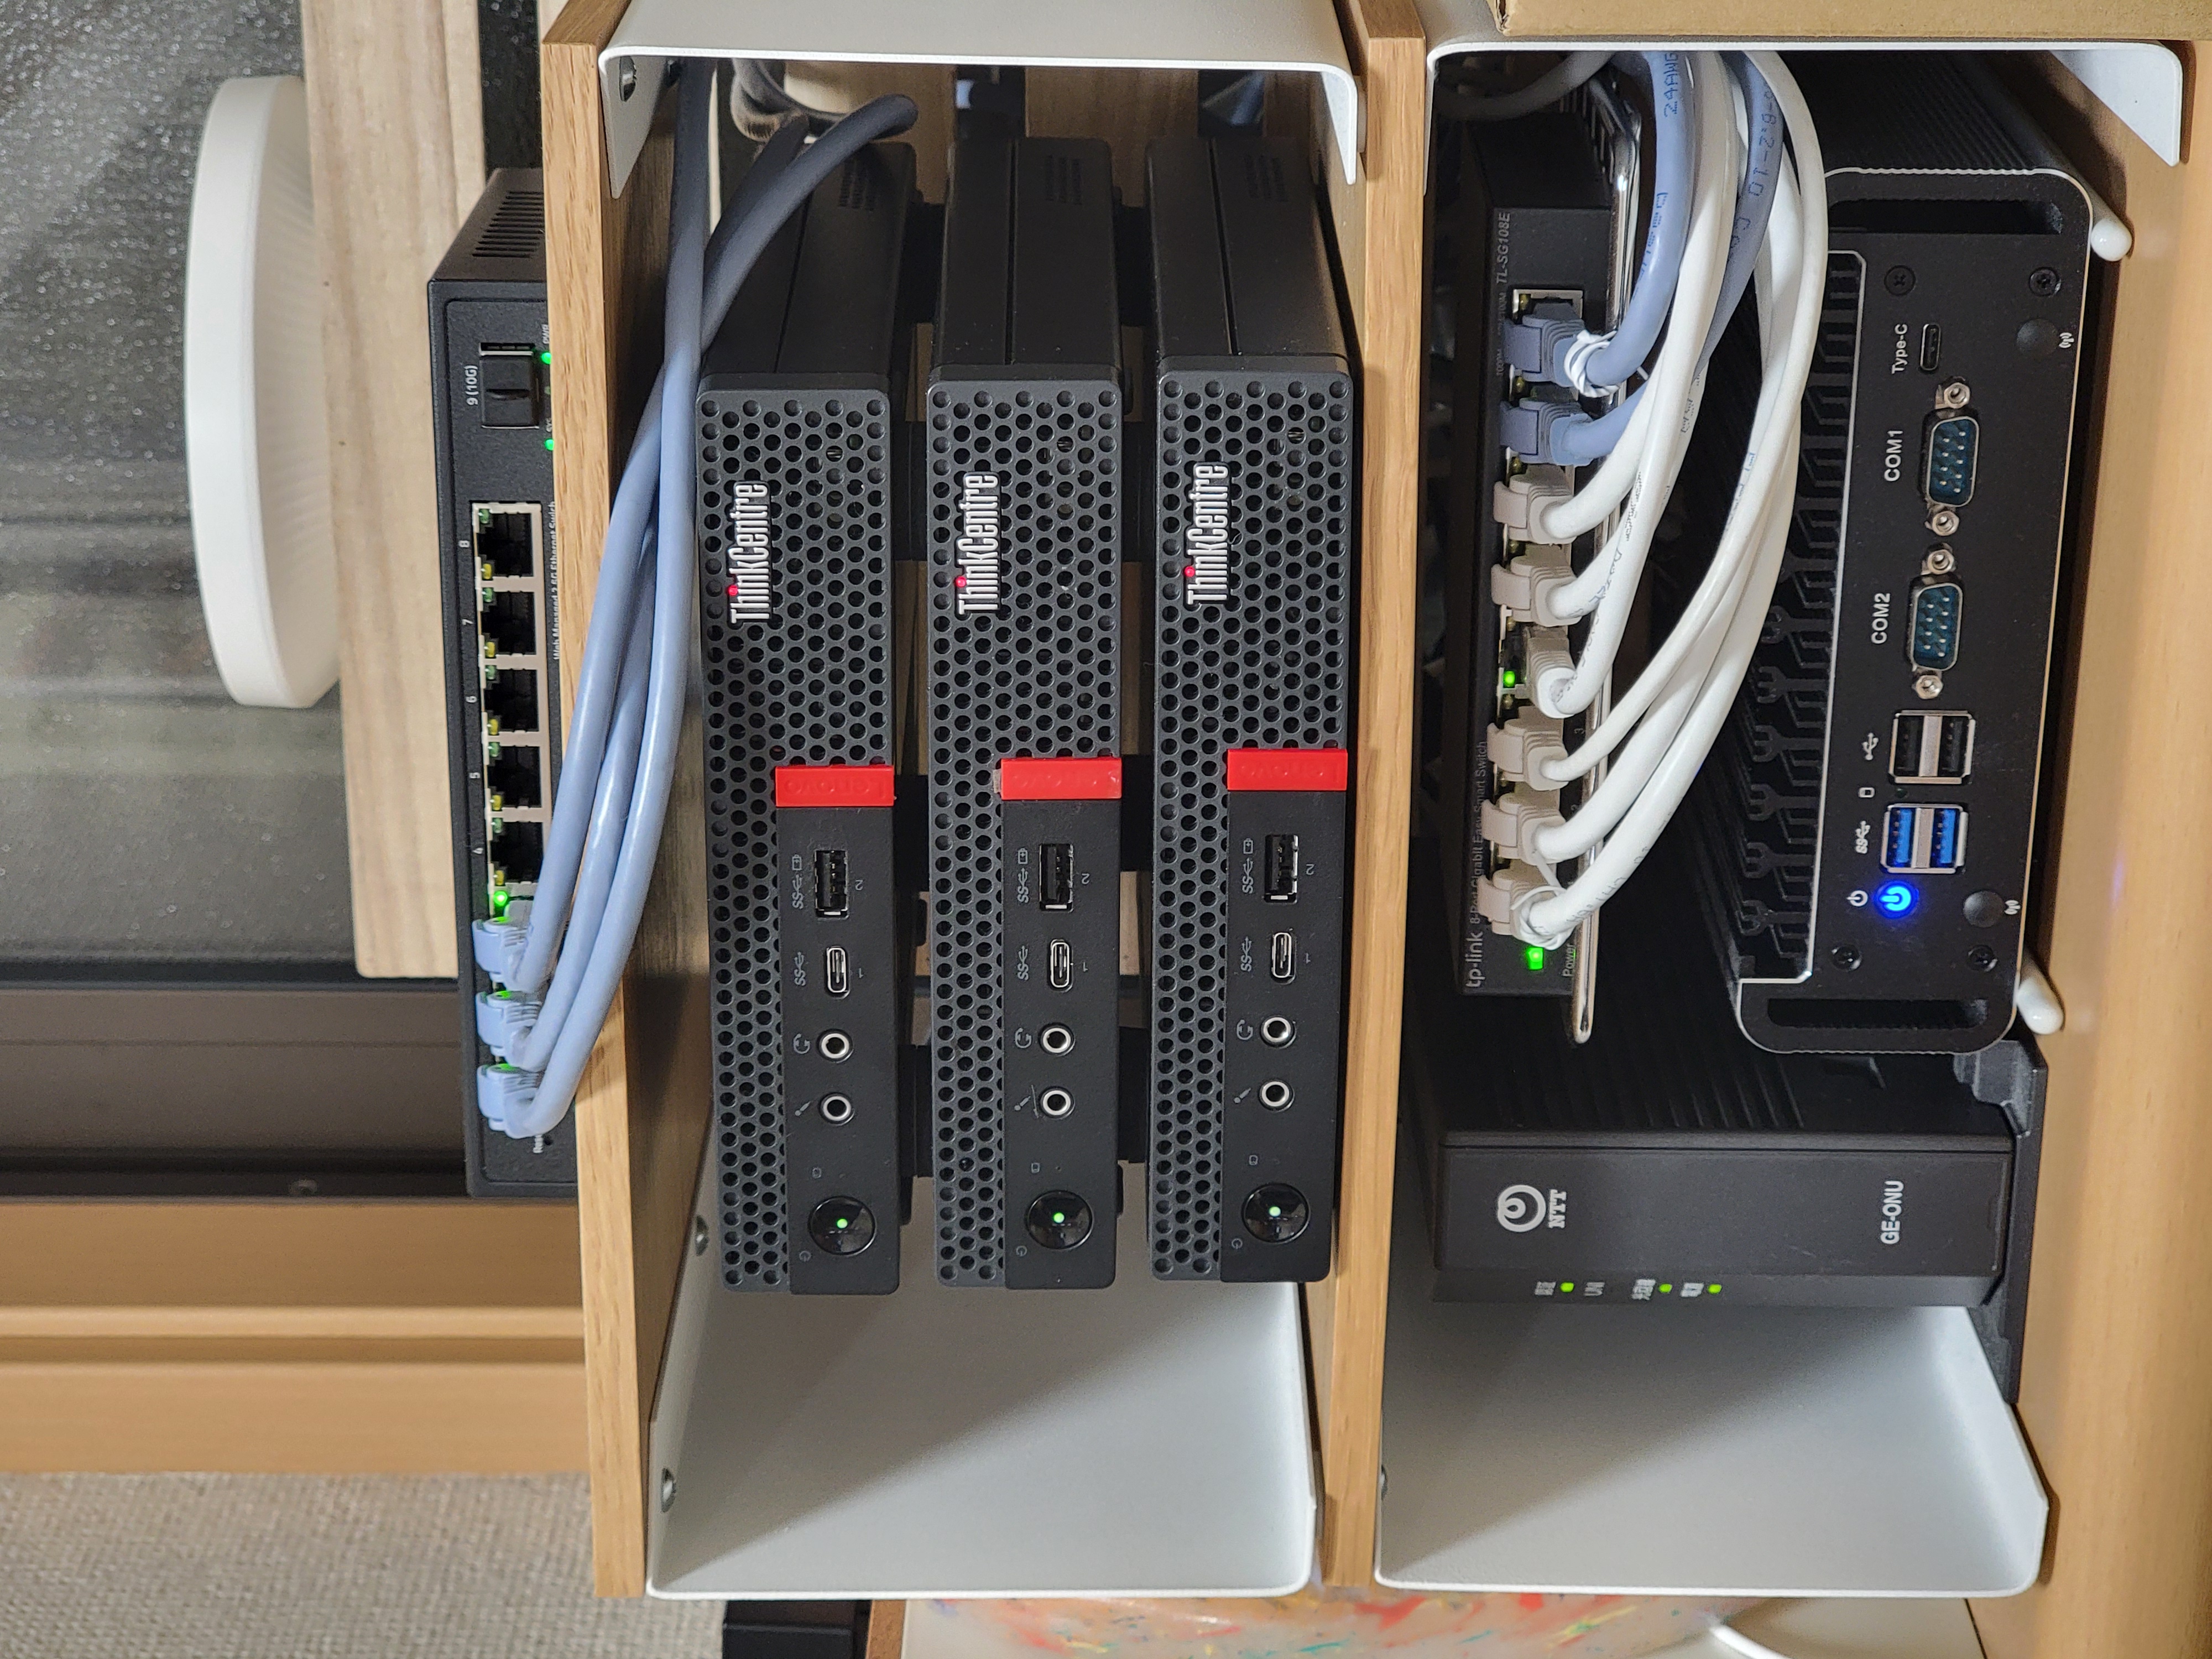
In the past couple of weeks I was able to source matching mini USFF PCs which upgrades the mini homelab from 14 CPU cores to 18! Along with this I decided to attach a 2.5Gbe NIC and a 1TB NVME on each device to be used for Ceph allowing for hyper-converged infrastructure.
Ceph on its own is a huge topic. It has so many moving parts-monitors, metadata servers, OSDs, placement groups to name a few. And yes I am completely new to it. The good thing in today’s age every beautiful piece of software together with the community backing it stems from how well the user documenation is written. Here I am not just talking about Ceph but also Proxmox. Both applications have very well-written documentation to get you started, and if anything just goes haywire, you have a plethora of resources to point you back to the right direction.

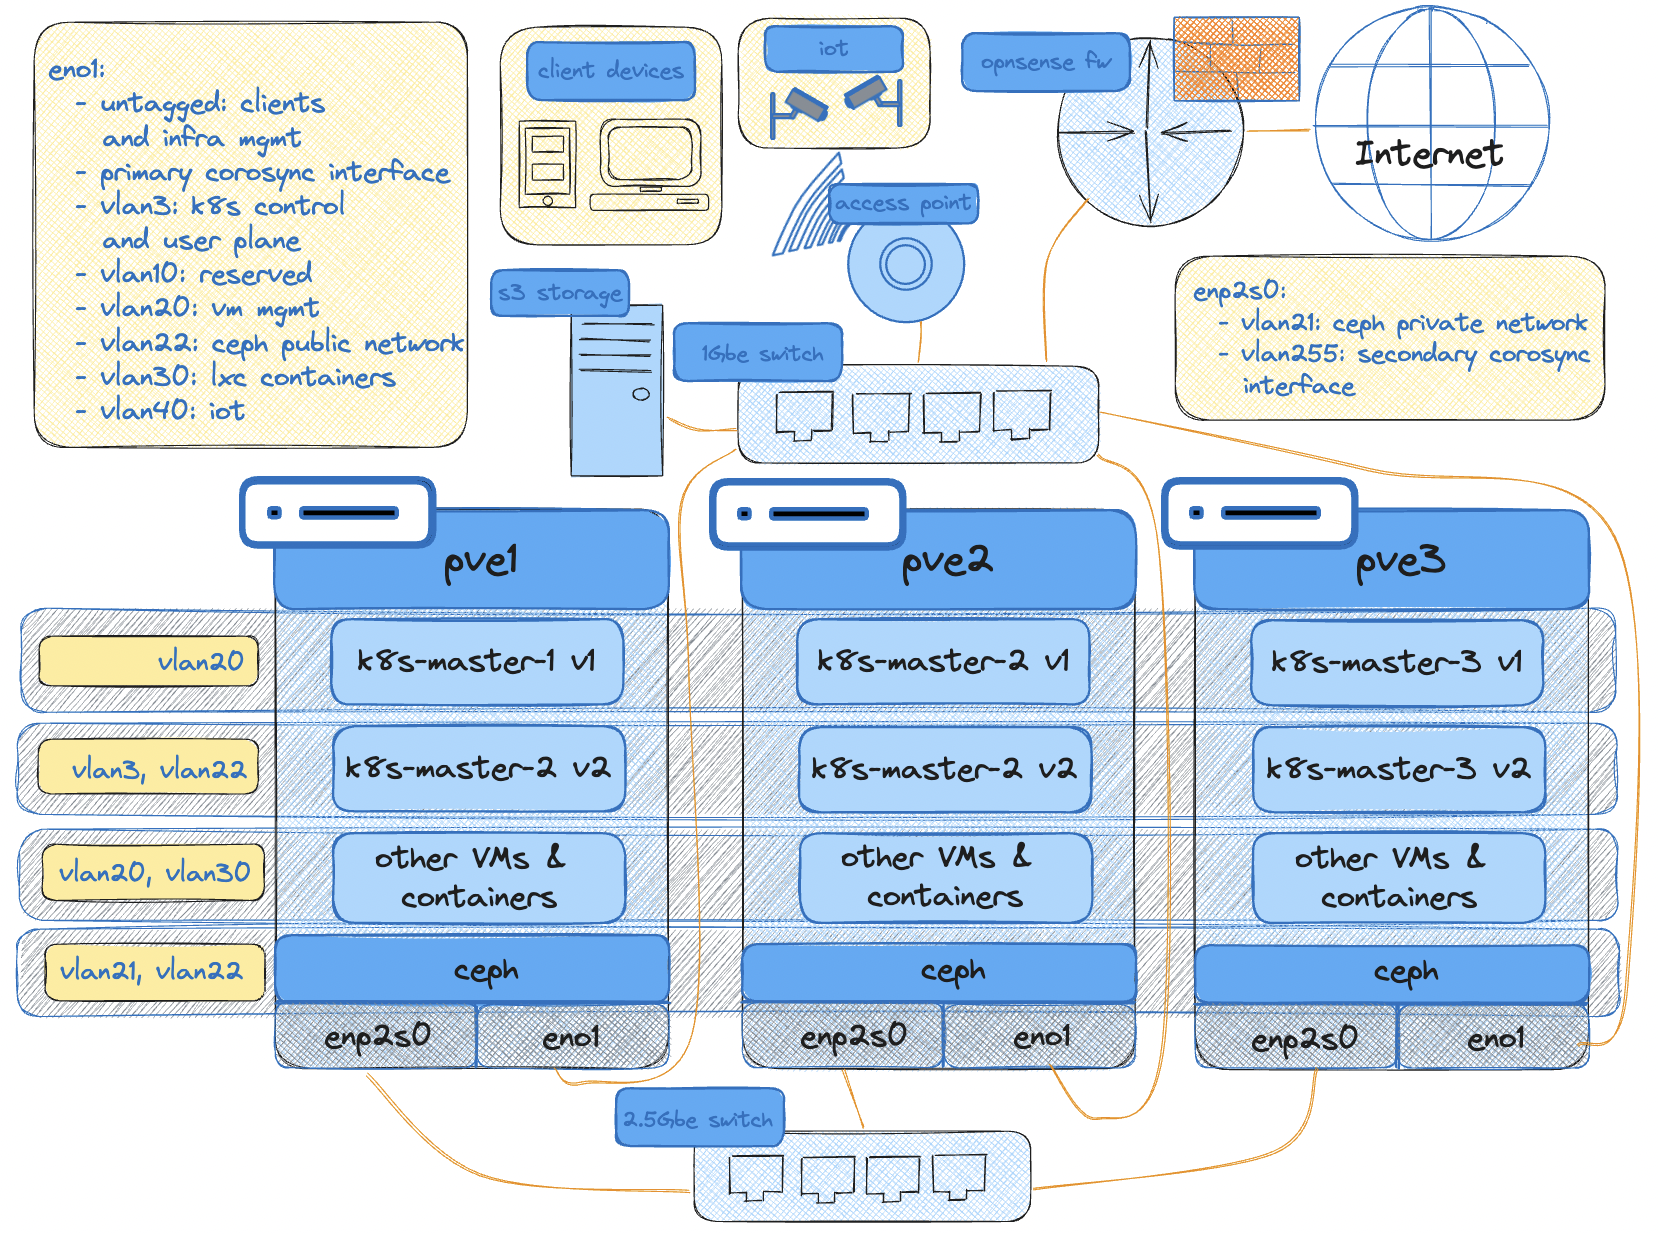
That said, Proxmox also nicely integrates Ceph and the complete installation can be done from the GUI itself. All I had to do was create the VLANs and specify the interface to be used for the public and private network. Though to be honest this part took me some time and a fair amount of ceph reinstallations to understand a bit more on the networking side.
Today’s agenda is to walk through how I was able to integrate my K8S cluster to an externally managed ceph storage, and how I am actually migrating to this new cluster by performing a disaster recovery procedure. I am also sharing here whatever resources were used for this operation.
References:
- https://pve.proxmox.com/wiki/Deploy_Hyper-Converged_Ceph_Cluster
- https://rook.io/docs/rook/latest-release/CRDs/Cluster/external-cluster/
- https://github.com/catalogicsoftware/velero-docs/blob/main/velero-intro-pvs/velero-intro.md
- https://velero.io/docs/v1.13/migration-case/
- https://velero.io/docs/v1.13/contributions/minio/
Current situation
At the moment I have an RKE2 cluster running Longhorn as my storage solution for persistent volumes. It has worked wonderfully -safeguarding my data with replication. But the long term goal had always been to leverage Proxmox’s built-in ceph management tool. Back then I was not having the appropriate hardware but with recent “reasonable” upgrades, I think now is the right time. There aren’t any heavy workload and majority of what are running are media management tools. The problem is the virtual disk is 150GB which takes up about a third of my 500GB SSD. Apart from this Longhorn storage is running on top of the same disk where the RKE2 ETCD DB is running and all just converge on the same physical disk where Proxmox is also installed. The cluster makes use of a single storageclass for both RWO and RWX PVCs. This cluster is also running in the same vlan where the rest of my VMs are also running. A single vNIC is attached for both k8s traffic, and longhorn replication traffic.
Planning and logistics
The second cluster will have about 100GB total size (about 80GB total of ephemeral storage after OS). Rook will be used to connect to the Proxmox-managed ceph cluster for persistent volumes. With this the cluster will have two storageclasses — ceph-rbd for RWO PVCs, and cephfs for RWX. Each VM will have two vNICs attached. First vNIC will be assigned a new VLAN3 to be used solely for k8s traffic, and the second vNIC will be running in another VLAN dedicated for ceph traffic. Velero will be used to migrate to the new cluster. MinIO will be used as the S3-compatible storage for storing the backups. Existing Cilium LB IPs will be re-used by re-learning BGP routes from the main router with the new VLAN.
I am working on a diagram for the network at home and although it’s still work in progress, it should be more than enough to help you understand how things are connected and segmented.
To expound more on this, on high-level we have two clusters - cluster 1 (old) and cluster 2 (new). The migration will go as follows:
- First we will prepare cluster 2 by integrating to an external ceph cluster.
- Then install velero on both k8s clusters.
- On cluster 1, perform a backup of the resources.
- Go back to cluster 2 and perform the restore. RWO PVCs directly should be migrated to ceph-rbd, and the RWX PVCs to be migrated to cephfs.
- Block cluster 1 IPs (on VLAN20) from internet access to avoid issues with cert-manager.
- Enable BGP peering on cluster 2 (VLAN3) and reconfigure BGP on OPNsense to route externally exposed IPs to this cluster.
Installing Rook and integrating with an external cluster
Download create-external-cluster-resources.py:
curl -s https://raw.githubusercontent.com/rook/rook/release-1.13/deploy/examples/create-external-cluster-resources.py > create-external-cluster-resources.py
Without enabling prometheus you might get the following error after the next step:
ExecutionFailureException: can't find monitoring_endpoint, prometheus module might not be enabled, enable the module by running 'ceph mgr module enable prometheus'
To avoid this you can either enable prometheus with the command below or add --skip-monitoring-endpoint when executing the python script.
ceph mgr module enable prometheus
Execute the script to generate the required environment variables:
python3 create-external-cluster-resources.py --rbd-data-pool-name tokyoceph --namespace rook-ceph-external --format bash
Sample output:
export NAMESPACE=rook-ceph-external
export ROOK_EXTERNAL_FSID=31833ea9-541d-435d-96ef-e9c653e97d2b
export ROOK_EXTERNAL_USERNAME=client.healthchecker
export ROOK_EXTERNAL_CEPH_MON_DATA=pve1=10.22.0.11:6789
export ROOK_EXTERNAL_USER_SECRET=AQAigfdlyQocHhAAtBlaM6EMLp9N6ysQoUUN2A==
export CSI_RBD_NODE_SECRET=AQAigfdlfB/OHhAAeVpSf6Ow4OE8pWjOU2XPkA==
export CSI_RBD_NODE_SECRET_NAME=csi-rbd-node
export CSI_RBD_PROVISIONER_SECRET=AQAigfdld8WCHxBBtakNxF2axoyXbghVzsLROA==
export CSI_RBD_PROVISIONER_SECRET_NAME=csi-rbd-provisioner
export CEPHFS_POOL_NAME=tokyocephfs_data
export CEPHFS_METADATA_POOL_NAME=tokyocephfs_metadata
export CEPHFS_FS_NAME=tokyocephfs
export CSI_CEPHFS_NODE_SECRET=AQA6gvdlNsZGKxAAXbWkhSawMStb+CGwV7Lurw==
export CSI_CEPHFS_PROVISIONER_SECRET=AQA6gvdlP3MhLBAA+vykqaFjLh20bagnGNwGsg==
export CSI_CEPHFS_NODE_SECRET_NAME=csi-cephfs-node
export CSI_CEPHFS_PROVISIONER_SECRET_NAME=csi-cephfs-provisioner
export MONITORING_ENDPOINT=10.22.0.12
export MONITORING_ENDPOINT_PORT=9283
export RBD_POOL_NAME=tokyoceph
export RGW_POOL_PREFIX=default
Paste the output in your shell environment either in the CLI or in the shell configuration file e.g. ~/.bashrc or ~/.zshrc. If you are pasting in your shell configuration file, don’t forge to reload.
Download the import script and run it:
curl -s https://raw.githubusercontent.com/rook/rook/release-1.13/deploy/examples/import-external-cluster.sh > import-external-cluster.sh
./import-external-cluster.sh
This import script will read the environment variables and accordingly create the necessary resources to connect to your external ceph cluster. The following resources should get created:
namespace/rook-ceph-external created
secret/rook-ceph-mon created
configmap/rook-ceph-mon-endpoints created
secret/rook-csi-rbd-node created
secret/rook-csi-rbd-provisioner created
secret/rook-csi-cephfs-node created
secret/rook-csi-cephfs-provisioner created
storageclass.storage.k8s.io/ceph-rbd created
storageclass.storage.k8s.io/cephfs created
Now it’s time to install rook! Take note of the first two lines. Here we specify the namespace where the rook operator will be running in and the namespace for the external ceph cluster. You can have a common namespace if you wish.
export operatorNamespace="rook-ceph"
export clusterNamespace="rook-ceph-external"
curl -s https://raw.githubusercontent.com/rook/rook/release-1.13/deploy/charts/rook-ceph/values.yaml > values.yaml
curl -s https://raw.githubusercontent.com/rook/rook/release-1.13/deploy/charts/rook-ceph-cluster/values-external.yaml > values-external.yaml
helm install --create-namespace --namespace $operatorNamespace rook-ceph rook-release/rook-ceph -f values.yaml
helm install --create-namespace --namespace $clusterNamespace rook-ceph-cluster \
--set operatorNamespace=$operatorNamespace rook-release/rook-ceph-cluster -f values-external.yaml
Logging the important nodes post helm installation (this is for personal reference. This part can be skipped):
# Operator installation
# Important Notes:
# - You must customize the 'CephCluster' resource in the sample manifests for your cluster.
# - Each CephCluster must be deployed to its own namespace, the samples use `rook-ceph` for the namespace.
# - The sample manifests assume you also installed the rook-ceph operator in the `rook-ceph` namespace.
# - The helm chart includes all the RBAC required to create a CephCluster CRD in the same namespace.
# - Any disk devices you add to the cluster in the 'CephCluster' must be empty (no filesystem and no partitions).

# CephCluster installation
# Important Notes:
# - Visit https://rook.io/docs/rook/latest/CRDs/ceph-cluster-crd/ for more information about the Ceph CRD.
# - You can only deploy a single cluster per namespace
# - If you wish to delete this cluster and start fresh, you will also have to wipe the OSD disks using `sfdisk`
In a few minutes you should be able to see a successful connection to your ceph cluster. You can also query the storageclasses created as part of the import script.
❯ k -n rook-ceph-external get cephcluster
NAME                 DATADIRHOSTPATH   MONCOUNT   AGE     PHASE       MESSAGE                          HEALTH      EXTERNAL   FSID
rook-ceph-external   /var/lib/rook     3          2m53s   Connected   Cluster connected successfully   HEALTH_OK   true       31833ea9-541d-435d-96ef-e9c653e97d2b

❯ k get sc
NAME       PROVISIONER                     RECLAIMPOLICY   VOLUMEBINDINGMODE   ALLOWVOLUMEEXPANSION   AGE
ceph-rbd   rook-ceph.rbd.csi.ceph.com      Delete          Immediate           true                   3h10m
cephfs     rook-ceph.cephfs.csi.ceph.com   Delete          Immediate           true                   3h10m
Installing velero on Cluster 1 and Cluster 2
For this I prepared five files:
- credentials-velero
- velero-exclude-nfs-volumepolicy.yaml
- minio-service-endpoint.yaml
- 1_velero-change-sc-configmap.yaml
- 2_velero-change-sc-cephfs-configmap.yaml
Before installation, ensure that you have an S3-compatible storage for storing backups. I am using MinIO hosted on my Openmediavault NAS. To be able to reach this from within my cluster, I have to create a service and endpoint manually pointing to the IP and port that should be reachable by the nodes. You can follow this yaml file and change the IP and port whichever is necessary:
apiVersion: v1
kind: Namespace
metadata:
  name: external
---
apiVersion: v1
kind: Service
metadata:
  namespace: external
  name: minio
spec:
  ports:
  - name: app
    port: 9000
    protocol: TCP
    targetPort: 9000
  - name: web
    port: 9001
    protocol: TCP
    targetPort: 9001
  clusterIP: None
  type: ClusterIP
---
apiVersion: v1
kind: Endpoints
metadata:
  namespace: external
  name: minio
subsets:
- addresses:
  - ip: 10.0.0.8
  ports:
  - name: app
    port: 9000
    protocol: TCP
  - name: web
    port: 9001
    protocol: TCP
Next we install velero on both clusters. To connect to an S3-compatible we must install the velero plugin for AWS apart from specifying it as the provider.
Input your S3 access and secret key in the following format:
[default]
aws_access_key_id = inputs3SecretKeyIdHere
aws_secret_access_key = inputs3SecretKeyHere
In the same install command we specify the backup location and point to the MinIO URL. We can follow the cluster FQDN format of svc-name.namespace.svc.cluster.local to reach this externally hosted service from within the pods.
velero install \
    --provider aws \
    --plugins velero/velero-plugin-for-aws:v1.9.1,velero/velero-plugin-for-csi:v0.7.0 \
    --use-node-agent --features=EnableCSI \
    --bucket velero \
    --secret-file ./credentials-velero \
    --use-volume-snapshots=false \
    --backup-location-config region=minio,s3ForcePathStyle="true",s3Url=http://minio.external.svc.cluster.local:9000
Execute velero backup-location get or v backup-location get if you also configured auto-completion:
❯ v backup-location get
NAME      PROVIDER   BUCKET/PREFIX   PHASE       LAST VALIDATED                  ACCESS MODE   DEFAULT
default   aws        velero          Available   2024-03-23 08:15:37 +0900 JST   ReadWrite     true
Perform backup on Cluster 1
First we create a configmap to disable backup of NFS volumes. We do not want NFS volumes to be part of the backup since these are expected to be remounted later on.
Create a file with the following content:
version: v1
volumePolicies:
- conditions:
    # nfs could be empty which matches any nfs volume source
    nfs: {}
  action:
    type: skip
kubectl -n velero create cm exclude-nfs-volumepolicy --from-file velero-exclude-nfs-volumepolicy.yaml
Create two backups - one for all RWX volumes, and another one for all RWO volumes. In my case the only application that is using an RWX volume is adguard. I can specify the namespace here. I don’t want the CRDs that are created dynamically by cilium so
v backup create all-rwx-fs-backup --default-volumes-to-fs-backup=true --exclude-resources storageclasses.storage.k8s.io,ciliumendpoints.cilium.io,ciliumidentities.cilium.io --include-namespaces adguard --resource-policies-configmap exclude-nfs-volumepolicy
For RWO volumes:
v backup create all-rwo-fs-backup --default-volumes-to-fs-backup=true --exclude-namespaces kube-system,longhorn-system,velero,adguard --exclude-resources storageclasses.storage.k8s.io,ciliumendpoints.cilium.io,ciliumidentities.cilium.io,ciliumbgppeeringpolicies.cilium.io --resource-policies-configmap exclude-nfs-volumepolicy --parallel-files-upload 10
❯ v backup get
NAME                STATUS      ERRORS   WARNINGS   CREATED                         EXPIRES   STORAGE LOCATION   SELECTOR
all-rwo-fs-backup   Completed   0        5          2024-03-23 09:31:50 +0900 JST   29d       default            <none>
all-rwx-fs-backup   Completed   0        0          2024-03-23 09:31:28 +0900 JST   29d       default            <none>
❯ k get pv
NAME                   CAPACITY   ACCESS MODES   RECLAIM POLICY   STATUS   CLAIM                              STORAGECLASS   REASON   AGE
adguard-conf-pv        1Gi        RWX            Retain           Bound    adguard/adguard-conf-pvc           longhorn                20d
adguard-work-pv        2Gi        RWX            Retain           Bound    adguard/adguard-work-pvc           longhorn                20d
code-server-pv         500Mi      RWO            Retain           Bound    vsc/code-server-config-pvc         longhorn                20d
dashy-config-pv        200Mi      RWO            Retain           Bound    dashy/dashy-config-pvc             longhorn                20d
grafana-pv             10Gi       RWO            Retain           Bound    grafana/grafana-pvc                longhorn                20d
influxdb-data-pv       10Gi       RWO            Retain           Bound    influxdb/influxdb-data-pvc         longhorn                20d
jellyseerr-config-pv   512Mi      RWO            Retain           Bound    jellyseerr/jellyseerr-config-pvc   longhorn                20d
radarr-config-pv       1Gi        RWO            Retain           Bound    radarr/radarr-config-pvc           longhorn                20d
sabnzbd-config-pv      512Mi      RWO            Retain           Bound    sabnzbd/sabnzbd-config-pvc         longhorn                20d
sonarr-config-pv       1Gi        RWO            Retain           Bound    sonarr/sonarr-config-pvc           longhorn                20d
wikijs-config-pv       512Mi      RWO            Retain           Bound    wikijs/wikijs-config-pvc           longhorn                20d
wikijs-data-pv         10Gi       RWO            Retain           Bound    wikijs/wikijs-data-pvc             longhorn                20d
Perform restoration on Cluster 2
Verify the same backups are reflected. Patch the backup-location as read-only to avoid overwriting the backups:
kubectl patch backupstoragelocation default \
    --namespace velero \
    --type merge \
    --patch '{"spec":{"accessMode":"ReadOnly"}}'
First we will restore all RWO volumes. Since we are changing the storageclass from longhorn to ceph-rbd, we have to create a configmap to allow this conversion. Apply 1_velero-change-sc-configmap.yaml:
apiVersion: v1
kind: ConfigMap
metadata:
  name: change-storage-class-config
  namespace: velero
  labels:
    velero.io/plugin-config: ""
    velero.io/change-storage-class: RestoreItemAction
data:
  longhorn: ceph-rbd
Execute the restoration:
v restore create --from-backup all-rwo-fs-backup
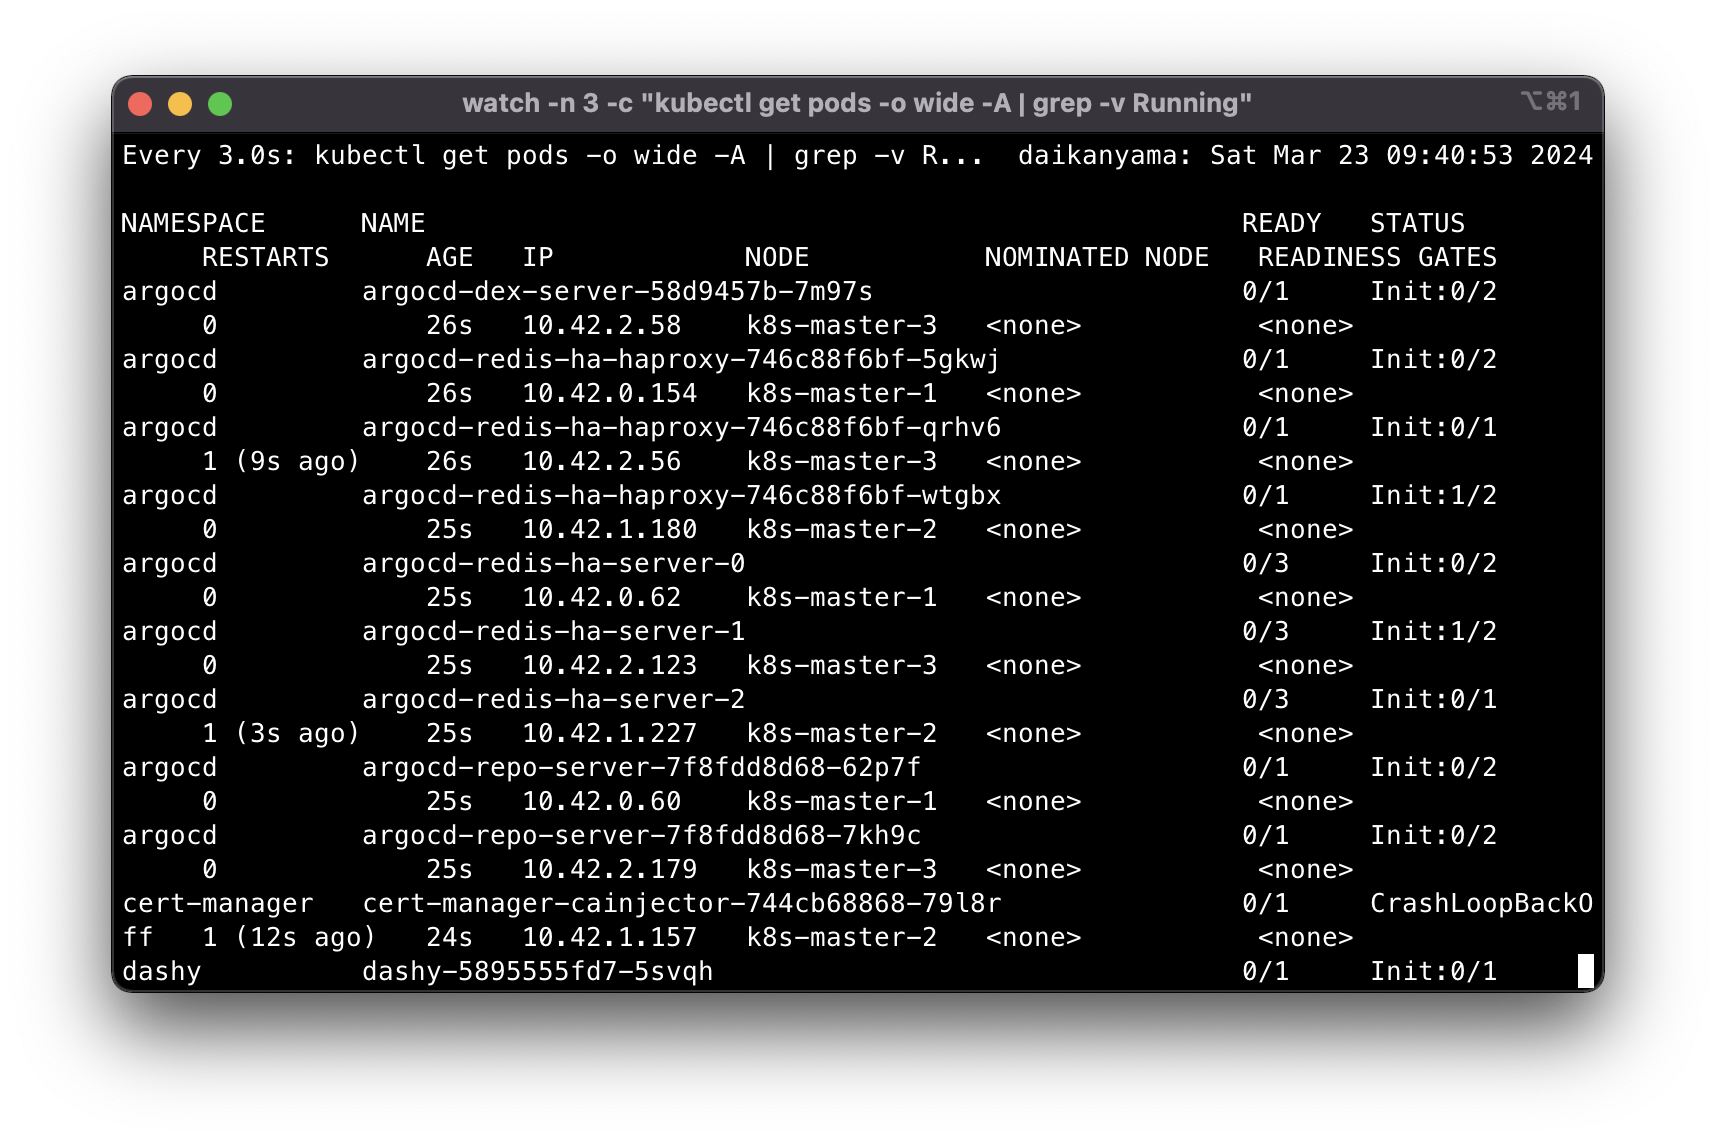
Wait for the pods to go up and running.
Next we update the config map to migrate longhorn storageclasses to cephfs. Apply 2_velero-change-sc-cephfs-configmap.yaml
apiVersion: v1
kind: ConfigMap
metadata:
  name: change-storage-class-config
  namespace: velero
  labels:
    velero.io/plugin-config: ""
    velero.io/change-storage-class: RestoreItemAction
data:
  longhorn: cephfs
v restore create --from-backup all-rwx-fs-backup
You can check the restoration status with
v restore get
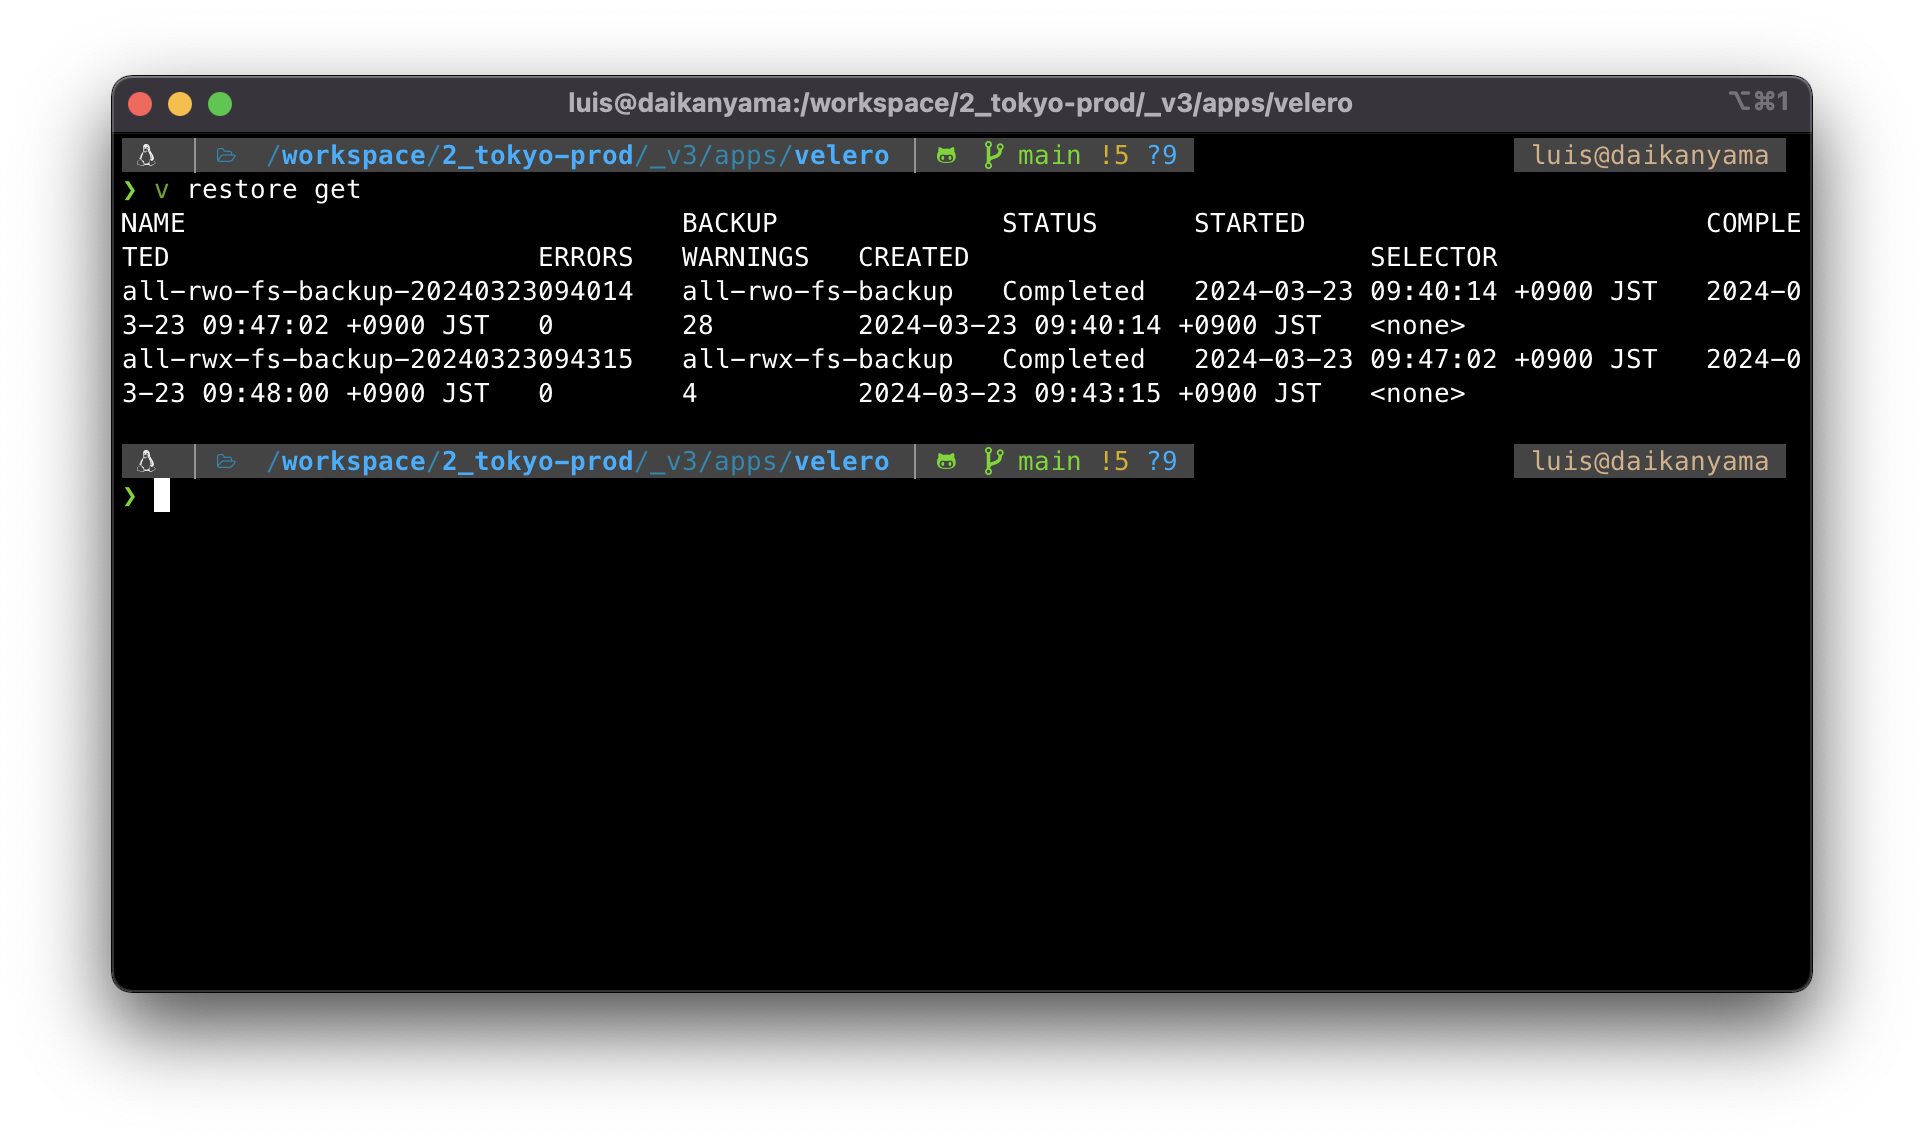
Have a look on your PVs and make sure everything is there. Check the storageclass as well.
❯ k get pv
NAME                                       CAPACITY   ACCESS MODES   RECLAIM POLICY   STATUS   CLAIM                              STORAGECLASS   REASON   AGE
pvc-002f450b-1765-4a2d-8900-916f83ac4fec   1Gi        RWO            Delete           Bound    sonarr/sonarr-config-pvc           ceph-rbd                168m
pvc-5613d3f3-473a-47ed-8e3f-8bedd3cb36c4   10Gi       RWO            Delete           Bound    grafana/grafana-pvc                ceph-rbd                168m
pvc-5d088e43-fd9e-4e08-ac4c-c095a681b18b   500Mi      RWO            Delete           Bound    vsc/code-server-config-pvc         ceph-rbd                168m
pvc-80d7d785-9c82-4995-808e-dfb7985c910e   512Mi      RWO            Delete           Bound    jellyseerr/jellyseerr-config-pvc   ceph-rbd                168m
pvc-853f057a-c851-474d-8825-3bfbe2eb6573   10Gi       RWO            Delete           Bound    wikijs/wikijs-data-pvc             ceph-rbd                168m
pvc-8f5a7b54-cffa-4453-909a-519e9dc74f83   512Mi      RWO            Delete           Bound    wikijs/wikijs-config-pvc           ceph-rbd                168m
pvc-a5734f5f-7f10-4e22-bcb0-9c2ab4d95023   10Gi       RWO            Delete           Bound    influxdb/influxdb-data-pvc         ceph-rbd                168m
pvc-b9a70ed6-1a60-4e2b-a1fe-1de19d64c1f5   512Mi      RWO            Delete           Bound    sabnzbd/sabnzbd-config-pvc         ceph-rbd                168m
pvc-c7d935b3-2194-43ac-96b7-5eb184cb716a   200Mi      RWO            Delete           Bound    dashy/dashy-config-pvc             ceph-rbd                168m
pvc-f0d2af55-b1d9-4d76-b929-03007c787529   1Gi        RWO            Delete           Bound    radarr/radarr-config-pvc           ceph-rbd                168m
pvc-f7e848cb-4ce8-47c9-8a81-65775fd1c747   1Gi        RWX            Delete           Bound    adguard/adguard-conf-pvc           cephfs                  161m
pvc-fa9a9b75-48e8-48f0-8e53-75105b80b913   2Gi        RWX            Delete           Bound    adguard/adguard-work-pvc           cephfs                  161m
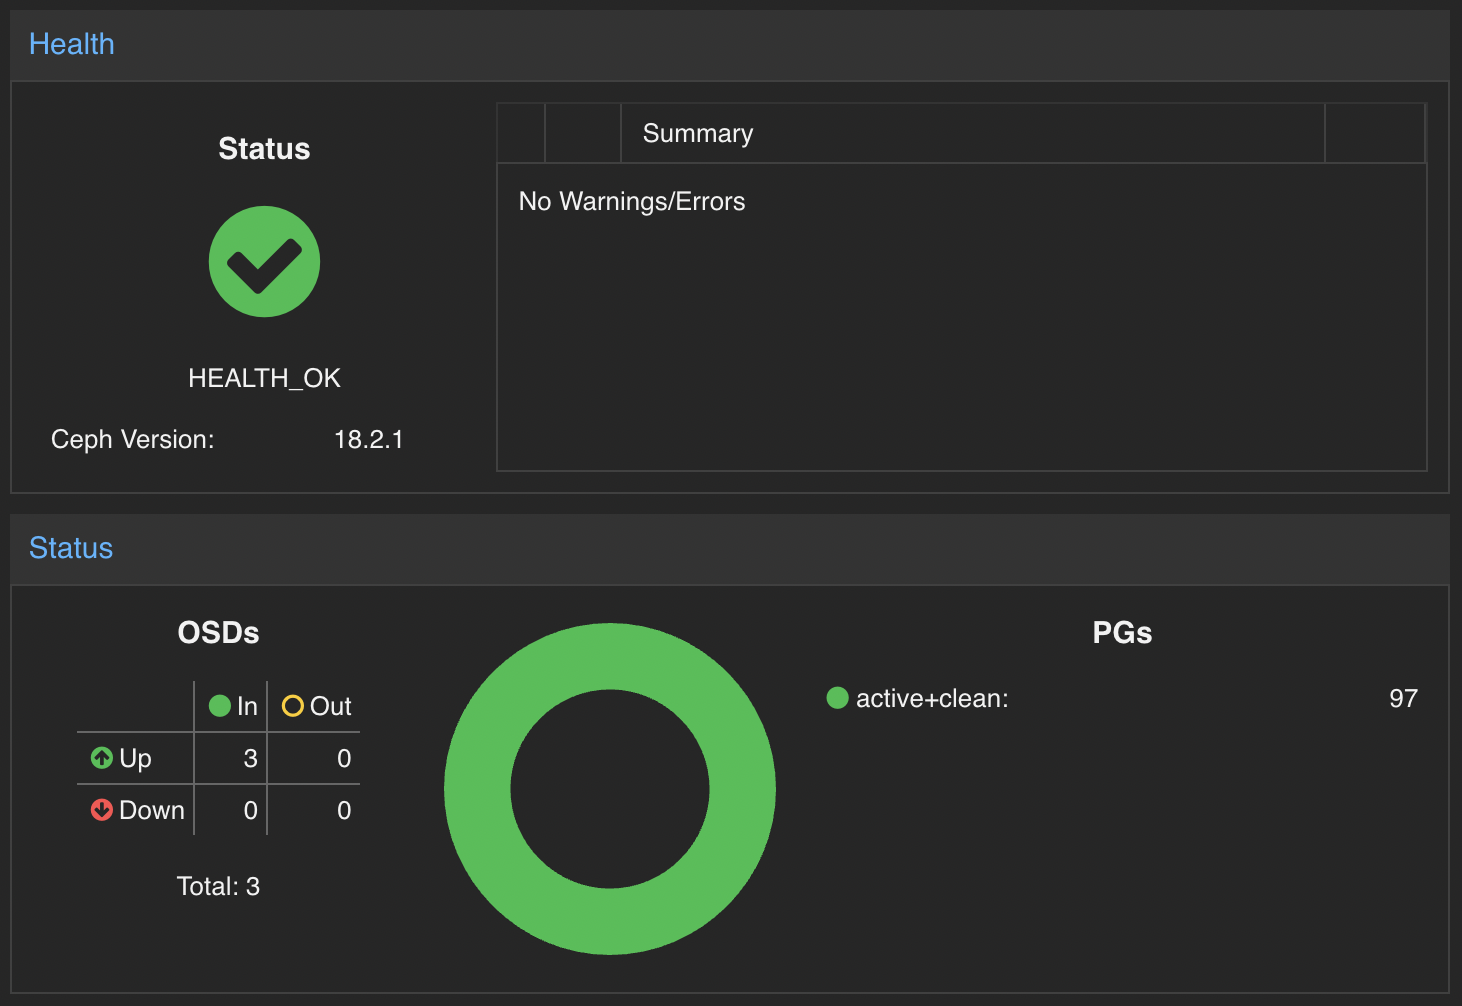
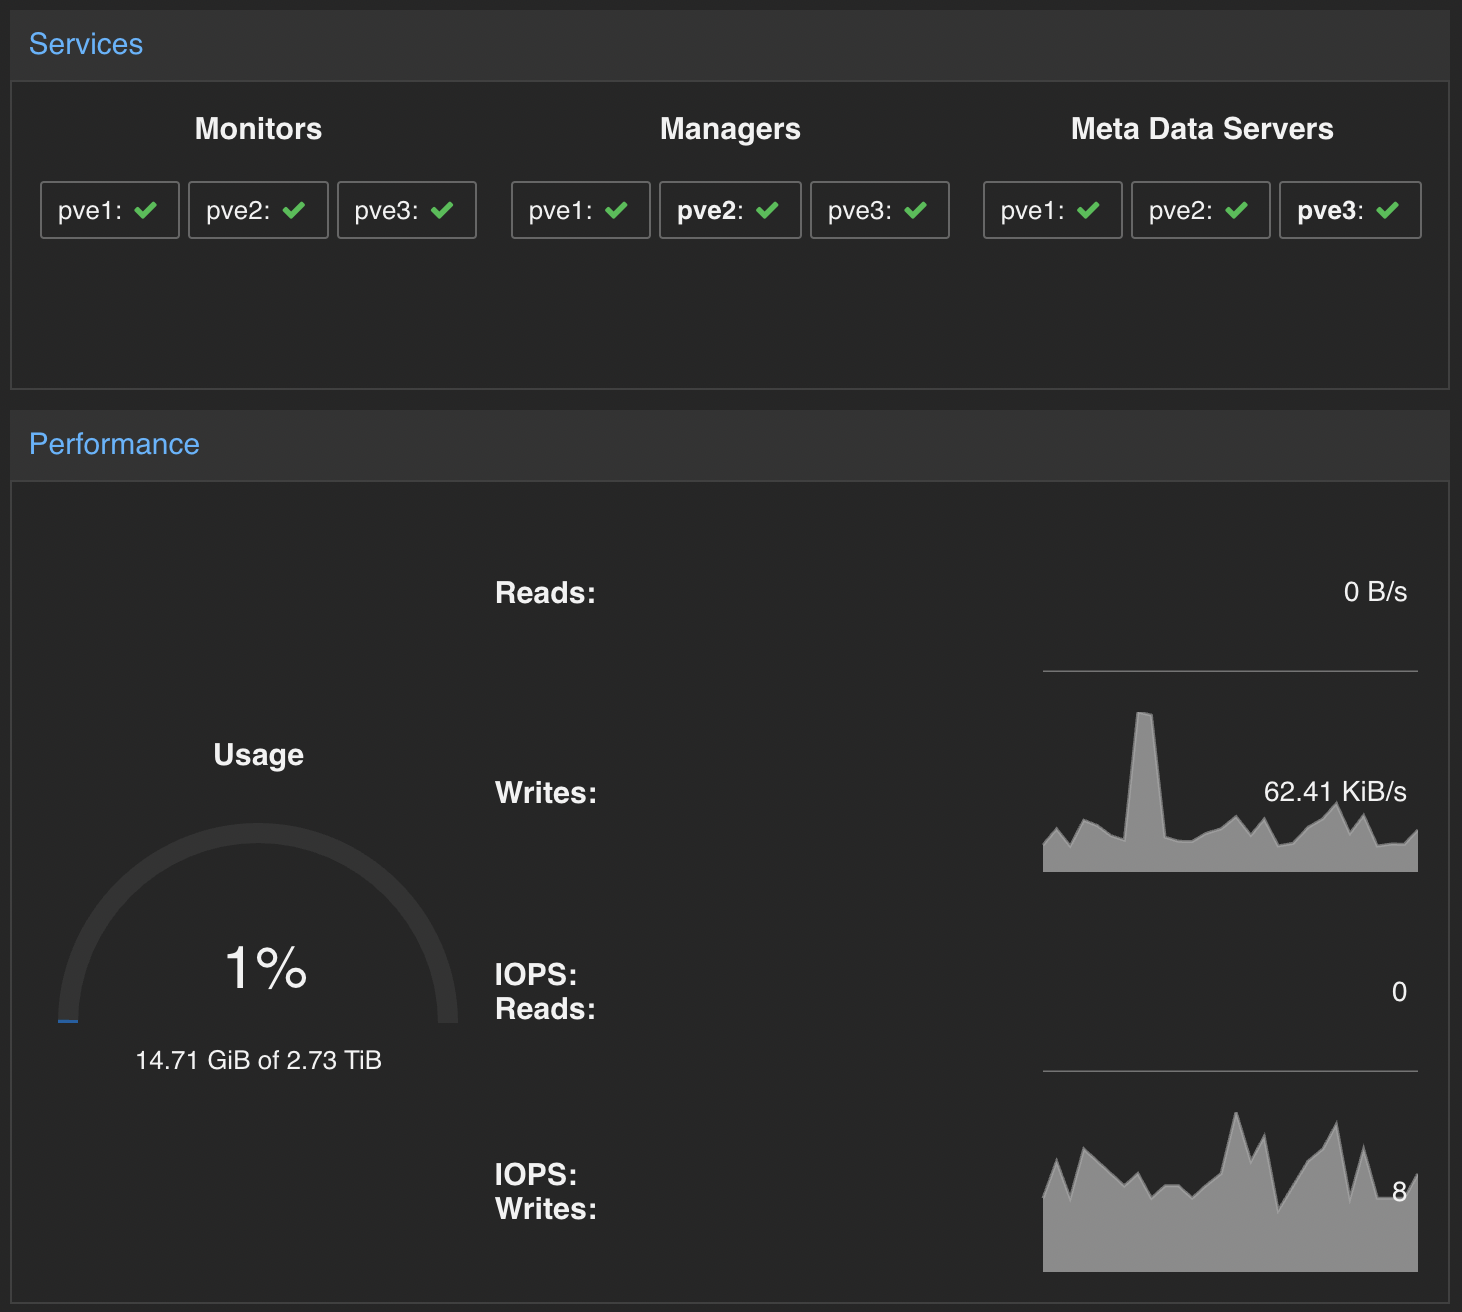
We should be able to see ceph logs by now continuously generating:
Ceph logs:
2024-03-24T10:25:57.822352+0900 mgr.pve2 (mgr.1064599) 46085 : cluster 0 pgmap v46023: 97 pgs: 97 active+clean; 3.4 GiB data, 14 GiB used, 2.7 TiB / 2.7 TiB avail; 17 KiB/s wr, 2 op/s
2024-03-24T10:25:59.822721+0900 mgr.pve2 (mgr.1064599) 46086 : cluster 0 pgmap v46024: 97 pgs: 97 active+clean; 3.4 GiB data, 14 GiB used, 2.7 TiB / 2.7 TiB avail; 19 KiB/s wr, 3 op/s
2024-03-24T10:26:01.823161+0900 mgr.pve2 (mgr.1064599) 46087 : cluster 0 pgmap v46025: 97 pgs: 97 active+clean; 3.4 GiB data, 14 GiB used, 2.7 TiB / 2.7 TiB avail; 27 KiB/s wr, 4 op/s
2024-03-24T10:26:03.823408+0900 mgr.pve2 (mgr.1064599) 46088 : cluster 0 pgmap v46026: 97 pgs: 97 active+clean; 3.4 GiB data, 14 GiB used, 2.7 TiB / 2.7 TiB avail; 19 KiB/s wr, 3 op/s
2024-03-24T10:26:05.823949+0900 mgr.pve2 (mgr.1064599) 46089 : cluster 0 pgmap v46027: 97 pgs: 97 active+clean; 3.4 GiB data, 14 GiB used, 2.7 TiB / 2.7 TiB avail; 29 KiB/s wr, 4 op/s
2024-03-24T10:26:07.824176+0900 mgr.pve2 (mgr.1064599) 46090 : cluster 0 pgmap v46028: 97 pgs: 97 active+clean; 3.4 GiB data, 14 GiB used, 2.7 TiB / 2.7 TiB avail; 22 KiB/s wr, 2 op/s
2024-03-24T10:26:09.824519+0900 mgr.pve2 (mgr.1064599) 46091 : cluster 0 pgmap v46029: 97 pgs: 97 active+clean; 3.4 GiB data, 14 GiB used, 2.7 TiB / 2.7 TiB avail; 23 KiB/s wr, 3 op/s
2024-03-24T10:26:11.824919+0900 mgr.pve2 (mgr.1064599) 46092 : cluster 0 pgmap v46030: 97 pgs: 97 active+clean; 3.4 GiB data, 14 GiB used, 2.7 TiB / 2.7 TiB avail; 51 KiB/s wr, 6 op/s
2024-03-24T10:26:13.825139+0900 mgr.pve2 (mgr.1064599) 46093 : cluster 0 pgmap v46031: 97 pgs: 97 active+clean; 3.4 GiB data, 14 GiB used, 2.7 TiB / 2.7 TiB avail; 41 KiB/s wr, 5 op/s
2024-03-24T10:26:15.825790+0900 mgr.pve2 (mgr.1064599) 46094 : cluster 0 pgmap v46032: 97 pgs: 97 active+clean; 3.4 GiB data, 14 GiB used, 2.7 TiB / 2.7 TiB avail; 53 KiB/s wr, 7 op/s
2024-03-24T10:26:17.826087+0900 mgr.pve2 (mgr.1064599) 46095 : cluster 0 pgmap v46033: 97 pgs: 97 active+clean; 3.4 GiB data, 14 GiB used, 2.7 TiB / 2.7 TiB avail; 42 KiB/s wr, 6 op/s
2024-03-24T10:26:19.826454+0900 mgr.pve2 (mgr.1064599) 46096 : cluster 0 pgmap v46034: 97 pgs: 97 active+clean; 3.4 GiB data, 14 GiB used, 2.7 TiB / 2.7 TiB avail; 44 KiB/s wr, 6 op/s
2024-03-24T10:26:21.826811+0900 mgr.pve2 (mgr.1064599) 46097 : cluster 0 pgmap v46035: 97 pgs: 97 active+clean; 3.4 GiB data, 14 GiB used, 2.7 TiB / 2.7 TiB avail; 50 KiB/s wr, 7 op/s
2024-03-24T10:26:23.827027+0900 mgr.pve2 (mgr.1064599) 46098 : cluster 0 pgmap v46036: 97 pgs: 97 active+clean; 3.4 GiB data, 14 GiB used, 2.7 TiB / 2.7 TiB avail; 21 KiB/s wr, 3 op/s
2024-03-24T10:26:25.827427+0900 mgr.pve2 (mgr.1064599) 46099 : cluster 0 pgmap v46037: 97 pgs: 97 active+clean; 3.4 GiB data, 14 GiB used, 2.7 TiB / 2.7 TiB avail; 30 KiB/s wr, 4 op/s
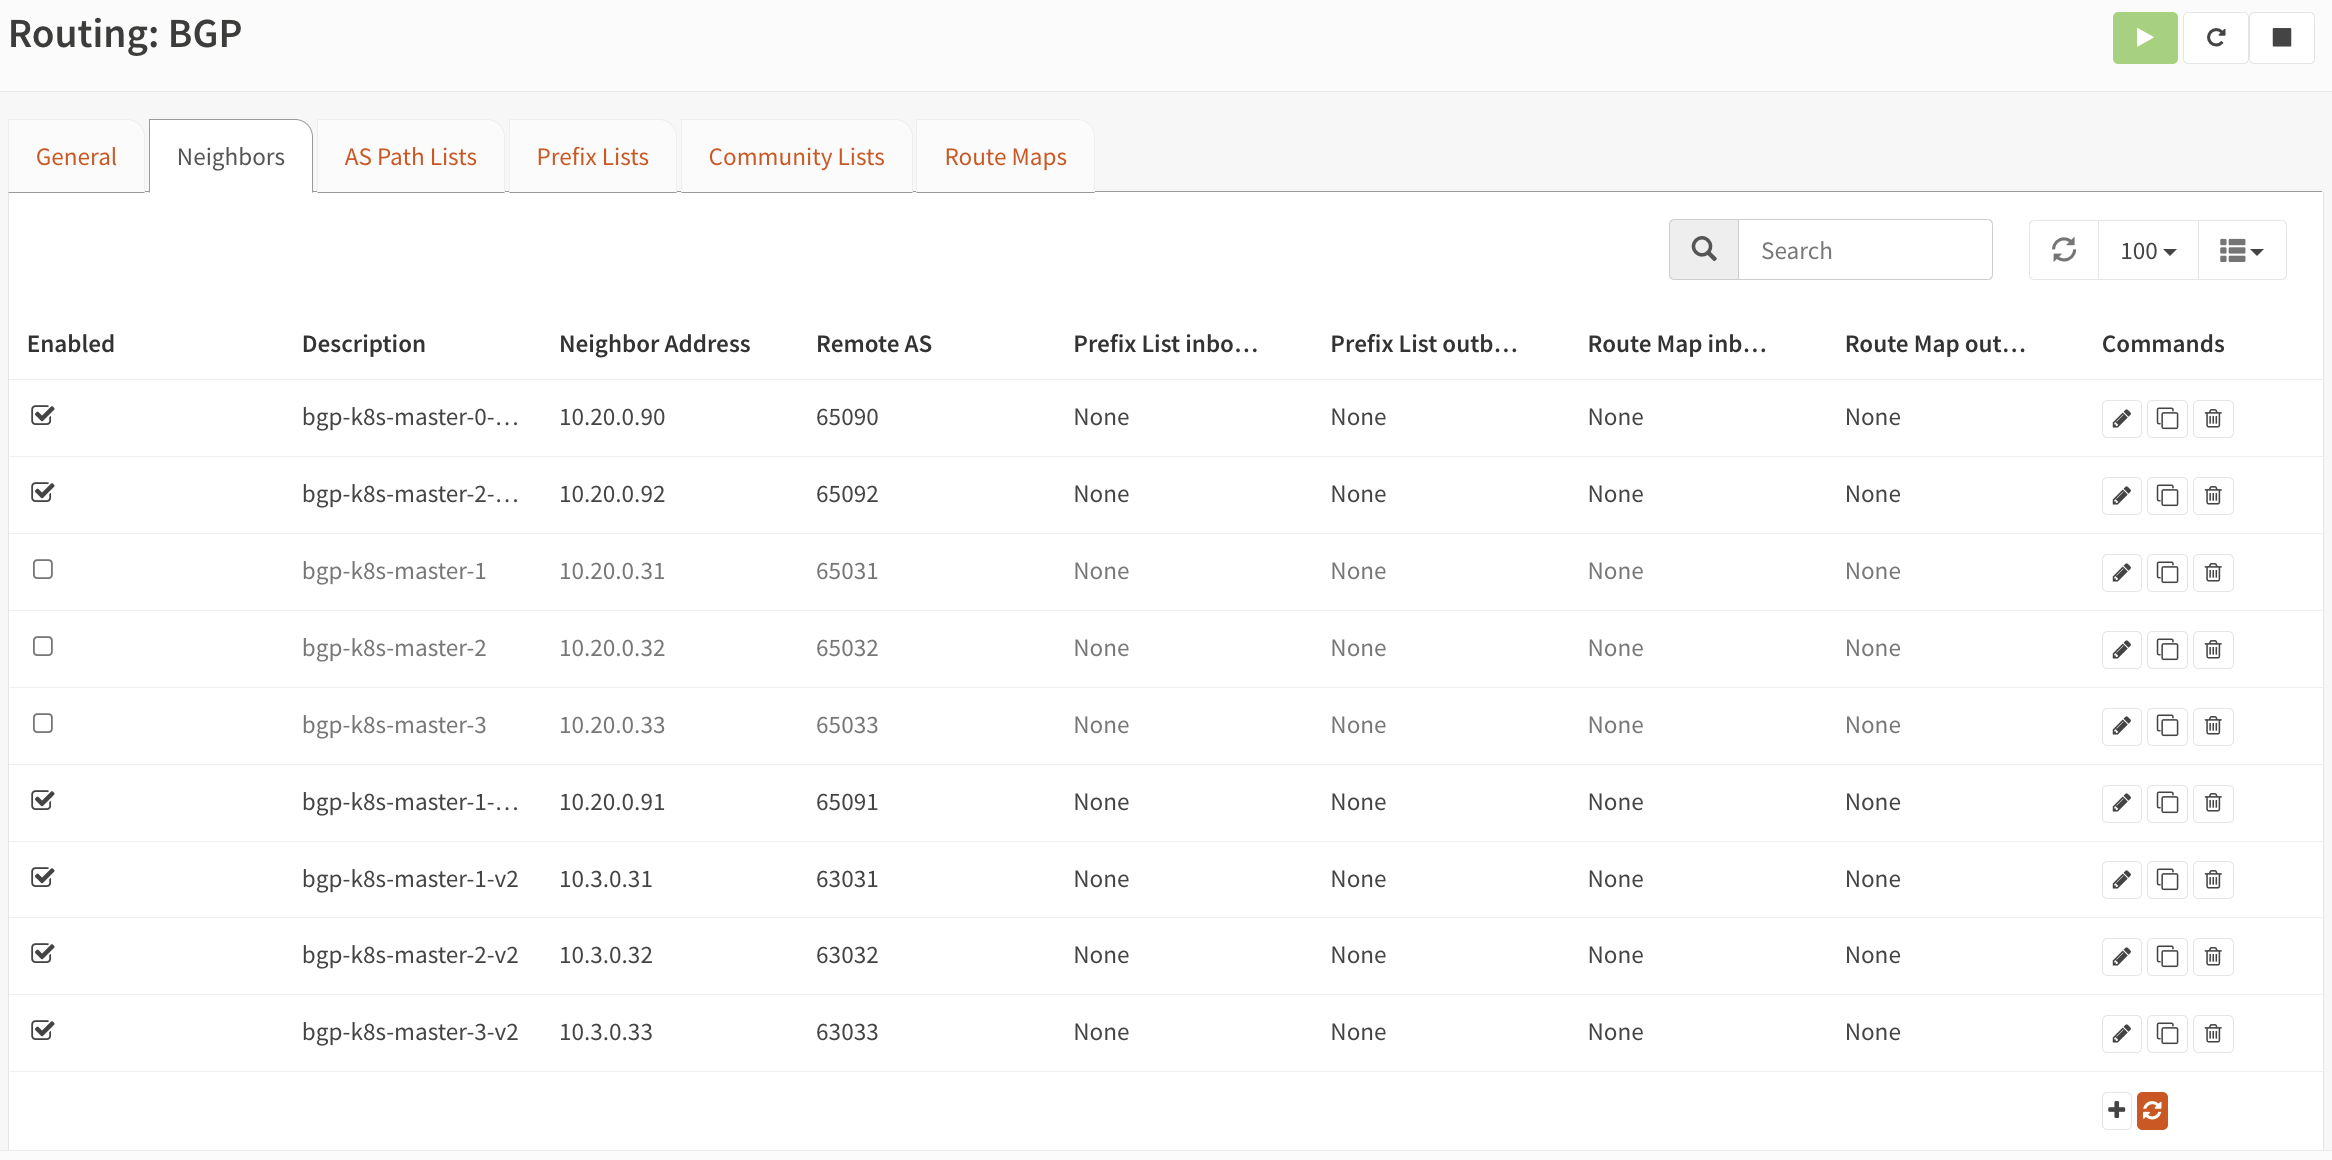
Migrate the BGP peers
The last but not the least is to remove the BGP peering with the old cluster and configure on the new one! If you are also using OPNsense and given you have the BGP peer configuration resources already created in the cluster, theh you just have to clone the existing BGP configuration (on OPNsense) for each of the old nodes, change the ASN number, and update the router ID to be in the new VLAN.
Onwards with Ceph
This sums up how I was able to migrate the storageclass from Longhorn to Ceph by performing disaster recovery to a new cluster. In the past I’ve done a similar kind of operationbut by simply restoring longhorn volumes with the same storageclass. It was fairly easy and longhorn even allows you to use the last PV and PVC name used. The backups can be stored in either NFS or S3 compatible storage as well. But with Velero it just feels a lot more straightforward. Since operation is via CLI, it allows you to prepare backup and restore commands that can be kept as a playbook for future use. By simply copy-pasting you will be able to restore your entire cluster without having to navigate in the GUI. Though don’t get me wrong - I am only saying this in relation to backup and restore. I haven’t even operated Longhorn long enough!
Talking about Ceph, I don’t really have anything to say yet. I just know it has long been established as the grandfather of distributed storage. The first time I came across it was at work when we started to face DB latency issues which seemed to be due to the bluestore cache and OSD memory facing some kind of memory leak. Personally I just started using it as the storage backend of my RKE2 cluster and so far connecting to it with Rook has been a breeze. With very minimal workload, I still look forward to any new learning I can get running my small cluster at home.