For the past few weeks, I’ve been working on making our home network stable after experiencing random reboots on my router and bombing the connection at home just right before leaving for work. All problems have been fixed now since the start of this month so I’ve had the time to continue with this other home project. Continuing from where I got off on k3s, I finally attempted to run a 4G EPC network in a small virtualized cluster.
Before going further, first, I’d like to thank the author of the tutorial, Infinity Don over at Dev.to, for sharing this cool idea together with the docker images. Ever since my interest in virtualization and containerization started, I have been looking for a weekend past-time for getting my hands dirty with, and luckily I stumbled upon his article here.
The article details on how to get everything running but I somehow still faced few minor issues. I’d still recommend to refer to the tutorial if you are someone who takes troubleshooting as a fun challenge.
I like recording everything I execute so if you have the intention of creating your own network and don’t want to be spoiled, then I’d suggest not to continue and just go read the tutorial above instead.
If you are just interested in how I got things working, then feel free to continue.
The objective
In bullet points:
- Create a cluster for running EPC components as simple as possible.
- Use k3s as the kubernetes platform to have a smaller resource footprint.
- Use Calico as the CNI instead of flannel (comes with k3s by default).
- Use GNS3 for network simulation so I can start getting familiar with it for future projects.
- Learn packet core!
VMs and Networking

The k3s cluster is running on Ubuntu 22.04 VMs. Openairinterface5G as the RAN and UE simulator as in the tutorial, though both are bifurcated into two VMs (the tutorial makes use of a single VM with the help of a second loopback address). For the latter, Ubuntu 18.04 was used to avoid any incompatibility issue since the documentation stated only this version. All Ubuntu VMs are assigned 4GB RAM. Ubuntu 22 VMs are assigned 2 vCPUs, and the two Ubuntu 18 VMs, with 4 vCPUs to speed up the build time of the simulator. For the router, the same Vyos router is used with separate connections for the management interface and the internet. I could have made use of the management interface as my internet gateway but I faced slow throughput when downloading packages on the VMs. The suggestion I got in the GNS3 forum is to use a NAT interface instead.
Preparing the environment
I am running a remote GNS3 server inside another Ubuntu VM. For this I had to enable nested virtualization (Intel VT-x in my case) in the BIOS. I also had to passthrough the CPU instruction set extensions to my GNS3 host, and from the host to the Ubuntu 18.04 VMs, to clear some errors I faced in the initial attempt of building the eNB and UE simulator. To make it easier I just configured CPU passthrough on both my hypervisor and the GNS3 server.
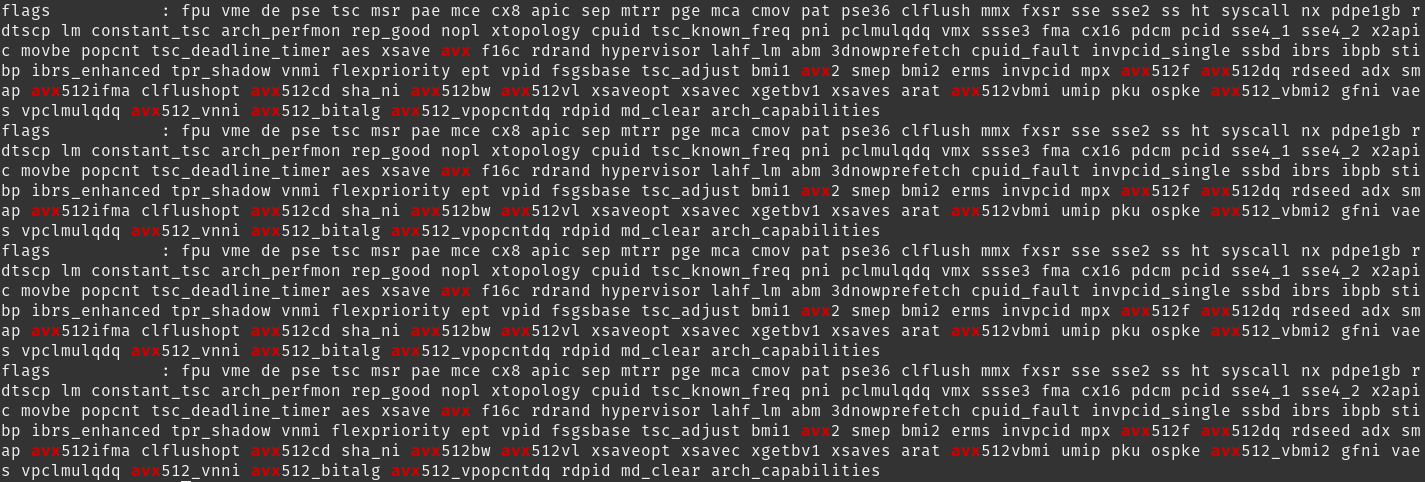
You can check if your VMs are having the CPU extended instruction set flags using the command below:
cat /proc/cpuinfo | grep -i avx
VM images were created with already updated packages so I don’t have to keep on updating everytime I have to re-instantiate a VM. For updating manually:
sudo apt-get update -y && sudo apt-get upgrade -y
As for the kubernetes platform, I used k3s. It comes with flannel as the CNI but it can be installed with Calico. The steps I followed for this are logged in another post.
Vyos configuration
Configuring VyOS is fairly simple though prior CLI experience with routers such as cisco and the likes will surely help. The documentation can be found here for installing Vyos on GNS3, and the configuration guide in this link.
To provide internet connectivity to my VMs I had to masquerade internal VM IPs towards the NAT GW. A static default route is set towards this GW, and the rest of routes are mainly for management access from the different external VLANs I have in my local network.
As for the BGP configuration, the command in the tutorial seems to be a little outdated. The following commands were used to enable BGP:
set protocols bgp neighbor 10.200.0.12 remote-as 63400
set protocols bgp system-as 63400
set protocols bgp neighbor 10.200.0.12 address-family ipv4-unicast
I faced some minor timing issue when merging pcap files. To fix, all I had to do was to ensure the same NTP server is used across all nodes.
Snippet of my Vyos configuration:
interfaces {
    ethernet eth0 {
        address 10.200.0.1/24
        hw-id 0c:0a:6b:f7:00:00
    }
    ethernet eth1 {
        address 172.16.0.1/24
        hw-id 0c:0a:6b:f7:00:01
    }
    ethernet eth2 {
        hw-id 0c:0a:6b:f7:00:02
    }
    ethernet eth3 {
        address 10.20.0.20/24
        hw-id 0c:0a:6b:f7:00:03
    }
    ethernet eth4 {
        address dhcp
        hw-id 0c:0a:6b:f7:00:04
    }
    loopback lo {
    }
}
nat {
    source {
        rule 100 {
            outbound-interface eth4
            source {
                address 10.200.0.0/24
            }
            translation {
                address masquerade
            }
        }
        rule 101 {
            outbound-interface eth4
            source {
                address 172.16.0.0/24
            }
            translation {
                address masquerade
            }
        }
    }
}
protocols {
    bgp {
        neighbor 10.200.0.12 {
            address-family {
                ipv4-unicast {
                }
            }
            remote-as 63400
        }
        system-as 63400
    }
    static {
        route 0.0.0.0/0 {
            next-hop 192.168.122.1 {
            }
        }
        route 10.0.0.0/24 {
            next-hop 10.20.0.1 {
            }
        }
        route 10.10.0.0/24 {
            next-hop 10.20.0.1 {
            }
        }
        route 10.30.0.0/24 {
            next-hop 10.20.0.1 {
            }
        }
        route 10.120.0.0/24 {
            next-hop 10.20.0.1 {
            }
        }
        route 10.130.0.0/24 {
            next-hop 10.20.0.1 {
            }
        }
        route 10.140.0.0/24 {
            next-hop 10.20.0.1 {
            }
        }
    }
}
service {
    ntp {
        allow-client {
            address 0.0.0.0/0
            address ::/0
        }
        server ntp.ubuntu.com {
            prefer
        }
    }
    ssh {
        port 22
    }
}
Installing Open5gs
Once the environment is ready, then it’s time to install Open5gs. Clone the repository to your local directory from Infinity Don’s repository.
git clone https://bitbucket.org/infinitydon/virtual-4g-simulator/src/master/open5gs/
The yaml files are based on older versions of kubernetes, so to make this work with the latest one at the time of this writing, that is v1.26.3, I had to modify hss-database/mongo-statefulset.yaml. Just update the apiVersion to rbac.authorization.k8s.io/v1 (remove beta1).
I had to specify the mongodb version as well in hss-database/monogo-statefulset.yaml to avoid mongodb going to crashloopback state (reference here).
      containers:
        - name: mongo
          image: mongo:4.2.10
Port 2123 on the SMF had to be opened to allow GTP-C connections with SGW. Update smf/smf-deploy.yaml and add the following.
smf-deploy.yaml
  - name: gtpc
    port: 2123
    protocol: UDP
If BGP is to be used then this next step is optional. This how I established the connection of the eNB to the MME before the realizing I would need BGP eventually. Here I just modified the mme-deploy.yaml to expose the MME IP for the s1ap connectivity.
mme-deploy.conf
apiVersion: v1
kind: Service
metadata:
  name: open5gs-mme-svc-pool
  namespace: open5gs
  labels:
    epc-mode: mme
spec:
  ports:
#  - name: s1ap
#    port: 36412
#    protocol: SCTP
#    nodePort: 36412
  - name: s6a
    port: 3868
    protocol: TCP
    nodePort: 30001
  type: NodePort
  selector:
    epc-mode: mme
The mme-configmap.yaml was also updated to set TAC to 1.
For the BGP configuration, the same yaml files from the tutorial were used. These yaml files are not present in the repository. Created a new directory and two yaml files with following configuration:
calico-bgpconfig.yaml
apiVersion: projectcalico.org/v3
kind: BGPConfiguration
metadata:
  name: default
spec:
  asNumber: 63400
calico-bgppeer.yaml
apiVersion: projectcalico.org/v3
kind: BGPPeer
metadata:
    name: bgppeer-vyos
spec:
    asNumber: 63400
    peerIP: 10.200.0.1
Time to spin up the core! I tried to execute in small steps but then encountered pods getting stuck in crashloopback state. This is because each pod was trying to bring up the peer connectivity with other pods.
First create the namespace:
kubectl create ns open5gs
Then execute all at once!
kubectl apply -f hss-database/
kubectl apply -f web-ui/
kubectl apply -f hss/
kubectl apply -f mme/
kubectl apply -f upf
kubectl apply -f sgw-u/
kubectl apply -f sgw-c/
kubectl apply -f smf/
kubectl apply -f pcrf/
kubectl apply -f nrf/
kubectl apply -f calico/
Expect some pods to be restarting and wait until you see all in running state.

Check the WebUI if you are able to access with default credentials admin / 1423.
Install OAISIM5G
Next is to install the simulator. I exhausted a lot of time trying to make it work with the latest available version only to realize that the article I was referring to is no longer valid after a certain development tag.
Download and extract the latest package suggested in the article:
wget https://gitlab.eurecom.fr/oai/openairinterface5g/-/archive/2021.w51_c/openairinterface5g-2021.w51_c.tar.gz
tar -zxvf openairinterface5g-2021.w51_c.tar.gz
enodeB configuration file
ci-scripts/conf_files/rcc.band7.tm1.nfapi.conf
    ////////// MME parameters:
    mme_ip_address      = ( { ipv4       = "10.200.0.11";
                              ipv6       = "192:168:30::17";
                              port       = 30002 ;
                              active     = "yes";
                              preference = "ipv4";
                            }
                          );
...
...
    NETWORK_INTERFACES :
    {
        ENB_INTERFACE_NAME_FOR_S1_MME            = "ens4";
        ENB_IPV4_ADDRESS_FOR_S1_MME              = "172.16.0.30";
        ENB_INTERFACE_NAME_FOR_S1U               = "ens4";
        ENB_IPV4_ADDRESS_FOR_S1U                 = "172.16.0.30";
        ENB_PORT_FOR_S1U                         = 2152; # Spec 2152
        ENB_IPV4_ADDRESS_FOR_X2C                 = "172.16.0.30";
        ENB_PORT_FOR_X2C                         = 36422; # Spec 36422

    };
...
...
MACRLCs = (
        {
        num_cc = 1;
        local_s_if_name  = "ens4";
        remote_s_address = "172.16.0.40";
        local_s_address  = "172.16.0.30";
        local_s_portc    = 50001;
        remote_s_portc   = 50000;
        local_s_portd    = 50011;
        remote_s_portd   = 50010;
        tr_s_preference = "nfapi";
        tr_n_preference = "local_RRC";
        }
Optional aliases for running OAISIM eNB and checking the logs:
alias oaisimenb='cd ~/openairinterface5g-2021.w51_c/cmake_targets/ran_build/build; sudo -E ./lte-softmodem -O ../../../ci-scripts/conf_files/rcc.band7.tm1.nfapi.conf > enb.log 2>&1'
alias oaisimenblogs='tail -f ~/openairinterface5g-2021.w51_c/cmake_targets/ran_build/build/enb.log'
UE configuration
ci-scripts/conf_files/ue.nfapi.conf with your preferred editor
...
...
L1s = (
        {
        num_cc = 1;
        tr_n_preference = "nfapi";
        local_n_if_name  = "ens4";
        remote_n_address = "172.16.0.30";
        local_n_address  = "172.16.0.40";
        local_n_portc    = 50000;
        remote_n_portc   = 50001;
        local_n_portd    = 50010;
        remote_n_portd   = 50011;
        }
);
...
...
Optional aliases for running OAISIM UE and checking the logs:
alias oaisimue='cd ~/openairinterface5g-2021.w51_c/cmake_targets/ran_build/build; nohup sudo -E ./lte-uesoftmodem -O ../../../ci-scripts/conf_files/ue.nfapi.conf --L2-emul 3 --num-ues 1 --nums_ue_thread 1 > ue.log 2>&1'
alias oaisimuelogs='tail -f ~/openairinterface5g-2021.w51_c/cmake_targets/ran_build/build/ue.log'
Building the simulators
When building the simulators the first time, it’s important to execute with the -I flag so it will also install the package dependencies. If you are building without -I after a fresh Ubuntu install, you will face some errors:
e.g. for eNB:
./build_oai -c -I --eNB
e.g. for UE:
./build_oai -c -I --UE
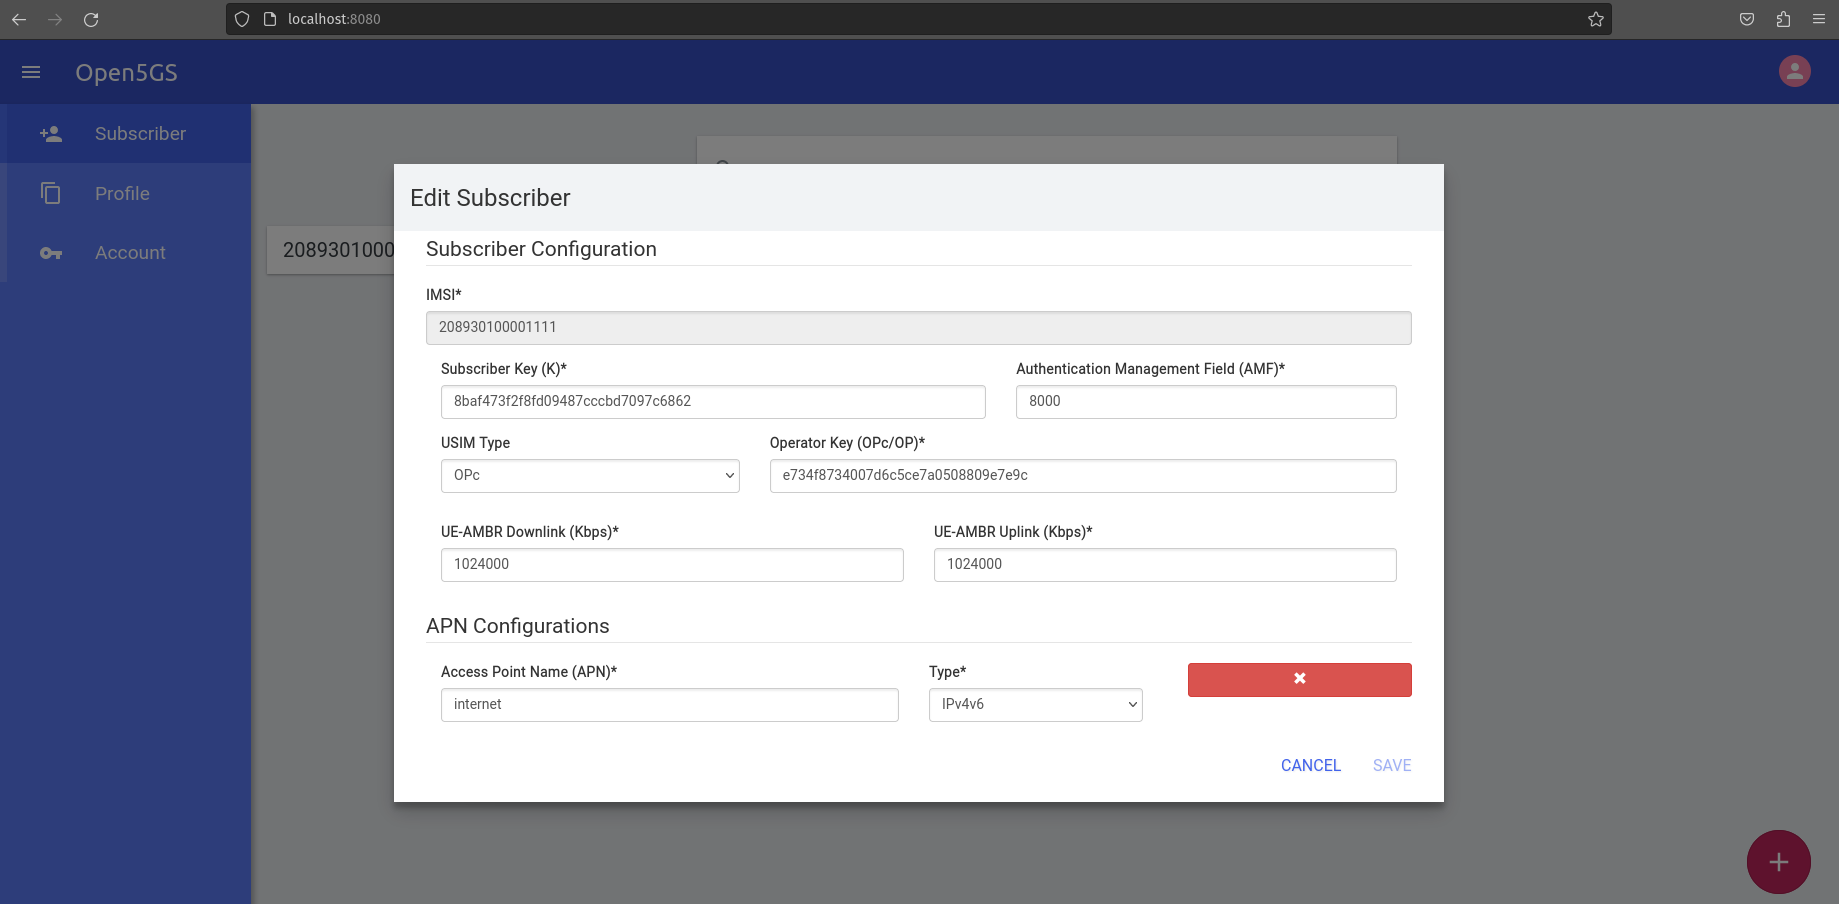
Define the HSS profile and run the simulator
The UE information can be taken from openair3/NAS/TOOLS/ue_eurecom_test_sfr.conf. This should be defined in the HSS via the WebUI.
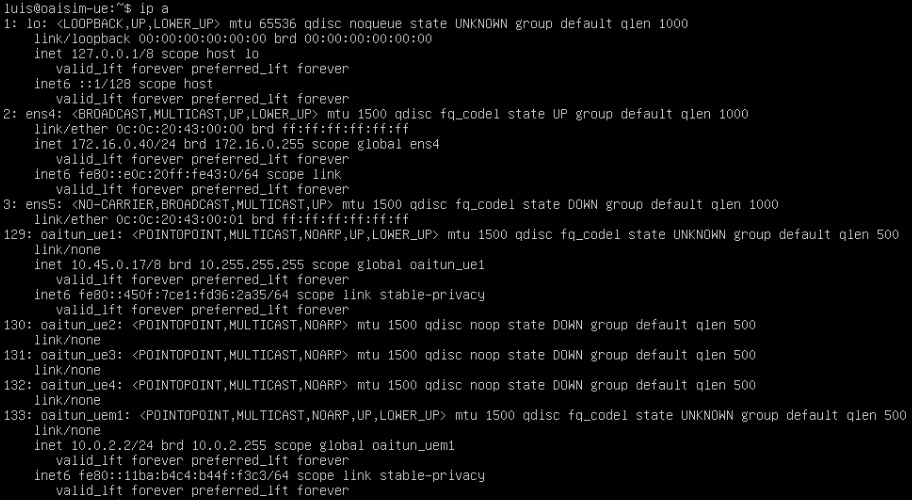
Once that is done, fire up the eNB and the UE. I lose ssh access to the VM whenever I start the UE simulator . I have to resort to VNC access to initiate some traffic like ping or iperf. The VM should have the PGW provided IP assigned to oaitun_ue1.

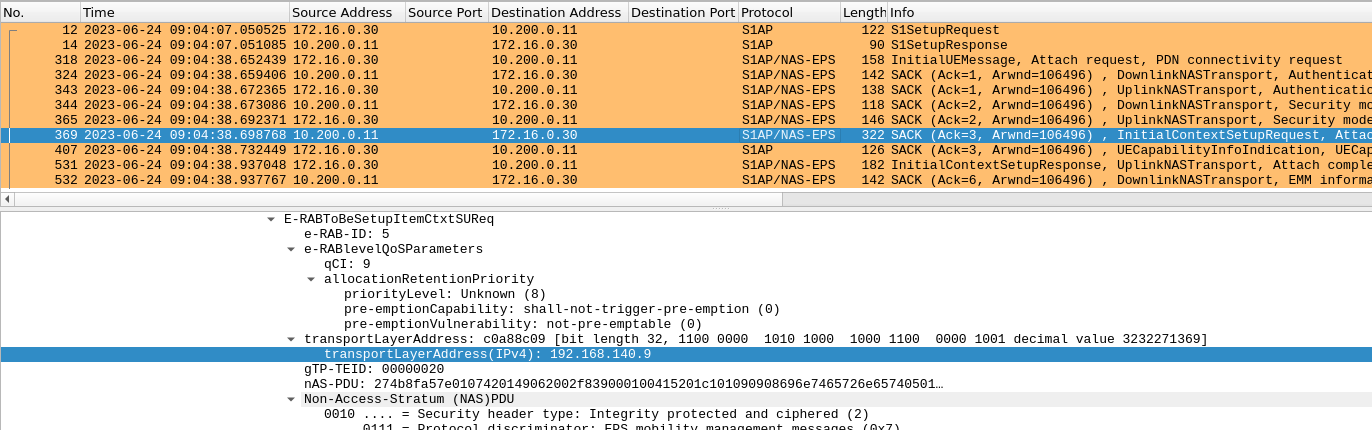
Below is a sample trace on the Vyos router for an UE ping request to the Google DNS. The first IP in each packet is the eNB IP and the second one of the UE’s.

| Packet No. | Event |
|---|---|
| 2563 | eNB forwards to the Vyos router |
| 2564 | Vyos forwards to SGW |
| 2565 | GTP stripped off and worker-1 hosting UPF forwards ICMP to Vyos |
| 2566 | Vyos performs NAT and sends to internet |
| 2567 | Ping response received |
| 2568 | Response is forwarded to worker-1 |
| 2569 | SGW forwards to Vyos the response encapsulated in GTP |
| 2570 | Vyos forwards to eNB |
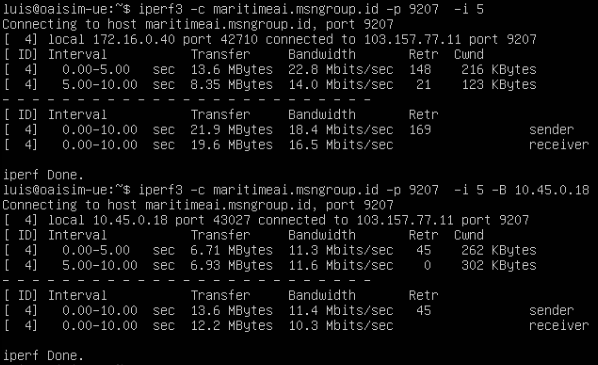
Below some throughput testing to a public IPerf server. First one is from the VM’s physical interface, second one over GTP.
My Sentiments:
I originally planned of avoiding BGP and save that for a later learning. But it was realized along the way that the eNB needs to be able to reach the pod IP address of the SGW. I initially configured a NAT on the Vyos router for this – DNAT-ing UDP traffic for the uplink from the SGW Pod IP (3GPP TS 36.413) to an exposed NodePort. While this worked with the eNB accepting the traffic, the response packets are coming out from a different SGW/worker source port. This shouldn’t be the case. The response destination port must be copied from the request source port according to 3GPP TS 29.281. I tried to configure another NAT for the response but the Vyos router just dropped the packets. Enabling the NAT logs didn’t help either because no logs were populating.
The solution was to resort to configuring BGP – exposing the Pod IP to the Vyos router so the eNB can reach SGW without any translation.
Talking about if this kind of setup will be helpful for learning EPC, I can’t really say yet. I published this post before I forget the logistics and everything, though I’m sure there’s a lot more to explore and it does feel like I can do a lot more with it. I also do not have much experience on the packet core side of things so it’s a bit hard to gauge but doing this project alone made me refer to 3GPP specs out of minimal curiousity. If playing around with these existing docker images will be tough, the option to install open5gs with VMs is always there. Another idea is to build docker images with the latest version of open5gs. In the end it all really depends on your objective. But whether what you plan to do is something simple or something complex, I am sure there will always be learning along the way.
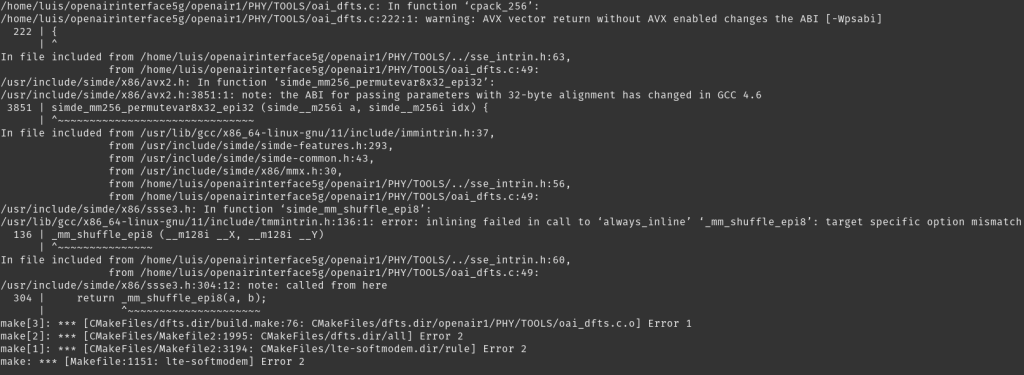
Other errors faced
I was able to capture some of the errors (not all) faced during the deployment. One of the first ones that showed up is the AVX warning error in the first attempt of building the OAISIM5G simulator. I was clueless at first since google wasn’t showing anything until I found a PDF stating that OAISIM5G needs a CPU that supports AVX. Realized that this must be listed under the extended instruction sets. So when I checked and found it there, I just had to make sure those flags are propagated all the way to my Ubuntu VMs.
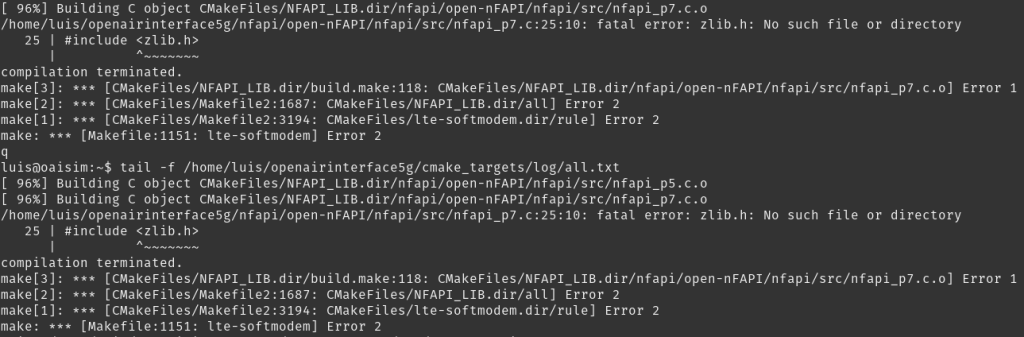
If you try to build the simulator without the -I flag, you will also face the following error. While you can also get away with it by manually installing the listed packages, it’s just better to do it by the official documentation to avoid potential problems later on.
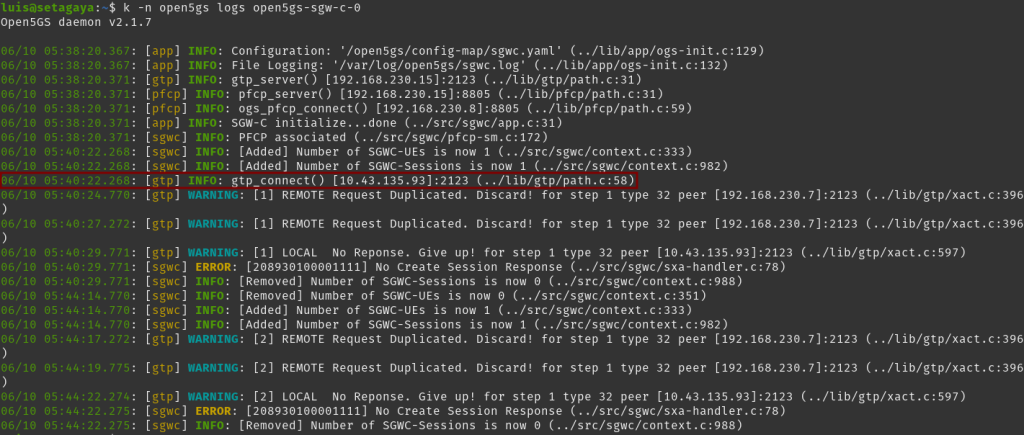
At one point I could see tunneled interface getting created on the UE simulator but with no IP getting assigned. When I checked the SGW logs it was showing no response is getting received for create session request. This is where I had to open up port 2123 for the connection to go through.
Below is also a snapshot showing the UDP response for GTP of SGW-U coming out of a different source IP due to the worker node performing a NAT on the source Pod IP. While you may be able to find a work around with it by configuring another NAT, I’ve had no luck trying to make it work. I retired from doing so since anyway a Pod IP (at least in this kind of setup) isn’t really best paired with a NAT.
